5.7 Installation of Ubuntu
✅ Installation on RM

✅ Installation on VM
- ☑️ Suggestion 1
Internal harddisk in order to avoid slow reading/writing access to USB
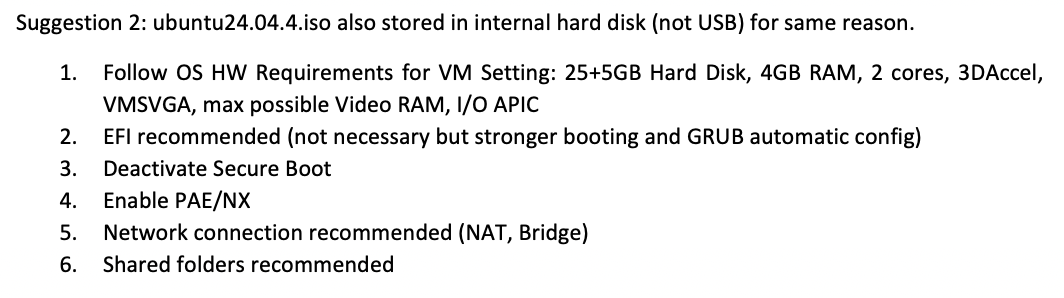
- ☑️ Suggestion 2
- The
isofor the Ubuntu in the VM - should be inside the
downloadsfolder(internal disk) ⭕️ - never install
isofrom the external disk ❌ - if you put
isofrom the USB, it will take a long time
✅ Incidents that can happen while installing Ubuntu on VM
- 😱 Incident: does not install
- If ubuntu does not install
- disable the
SVGA - or disable the
3D - in order to weaken the VM

- 😱 Incident: the screen is frozen
- ⭐️ Invalid settings: sometimes it is needed
- when after installing linux, the screen stays frozen
- deactivate
3DandSVGA
1
2
❓ Why does iso work in my computer but not in carlos's computer?
bc iso is a seed
- 😱 Incident: button does not appear
- even if you have
SVGA, - the continue button might not appear
💊 click on
tab, then click onenter key- 😱 Incident:
- everything is installed,
- but the next day, the machine does not boot
- ❓ why does this happen? we gave the required minimum RAM
💊 give more RAM
- 😱 Incident: mouse disappears
- after when everything is installed, mouse disappears
- ❓ why does this happen? not enough graphic power
- 💊 enable
3D acceleration, enableSVGA - mouse only work when minimum requirements are satisfied
- so before installing, maybe disable
3D accelerationandSVGA then after installing, if mouse is gone, enable
3D accelerationandSVGA- 😱 Incident: Missing booting system
- the
.isofile is missing .isoshould be added to thealmacenamiento > IDE- 😱 Incident: Not fatal error
- when the shared folder, the USB was entered last time,
- but now the VM cannot find it
- so when we have created shared folders
- but they cannot get activated bc we forgot to insert the USB
- 💊
accept the errororinsert the USB - if the USB that you insert today is different from the old one
- 1️⃣ If the USB has changed its letter, no problem
- 2️⃣ but if the USB has changed its letter,
- you will have to delete the old shared folder
and add the new USB as a shared folder
- 😱 Incident: Graphic interferences
- it happens bc of the 2D graphic problems
- this problem is not bc of 3D
- controller is also
VMSVGA, which is also correct 💊 when you have 2D issue, give more video RAM to the VM
- 💡 Note:
- same
.isocan behave differently depending on the host
💡 Summary
for installing modern linux in limited computers
- 1️⃣ creating VM
3D acceleration⭕️VMSVGA⭕️half of
Video RAM- 2️⃣ Installing ubuntu
.iso 3D acceleration❌VMSVGA❌we need to weaken the VM
- 3️⃣ Use ubuntu, but mouse disappears
3D acceleration⭕️VMSVGA⭕️
✅ The installation process is automatic
- should run automatically
- but sometimes it does not
- and you have to click on a button with a red star
- this button is for installing
- click on the button and install Ubuntu
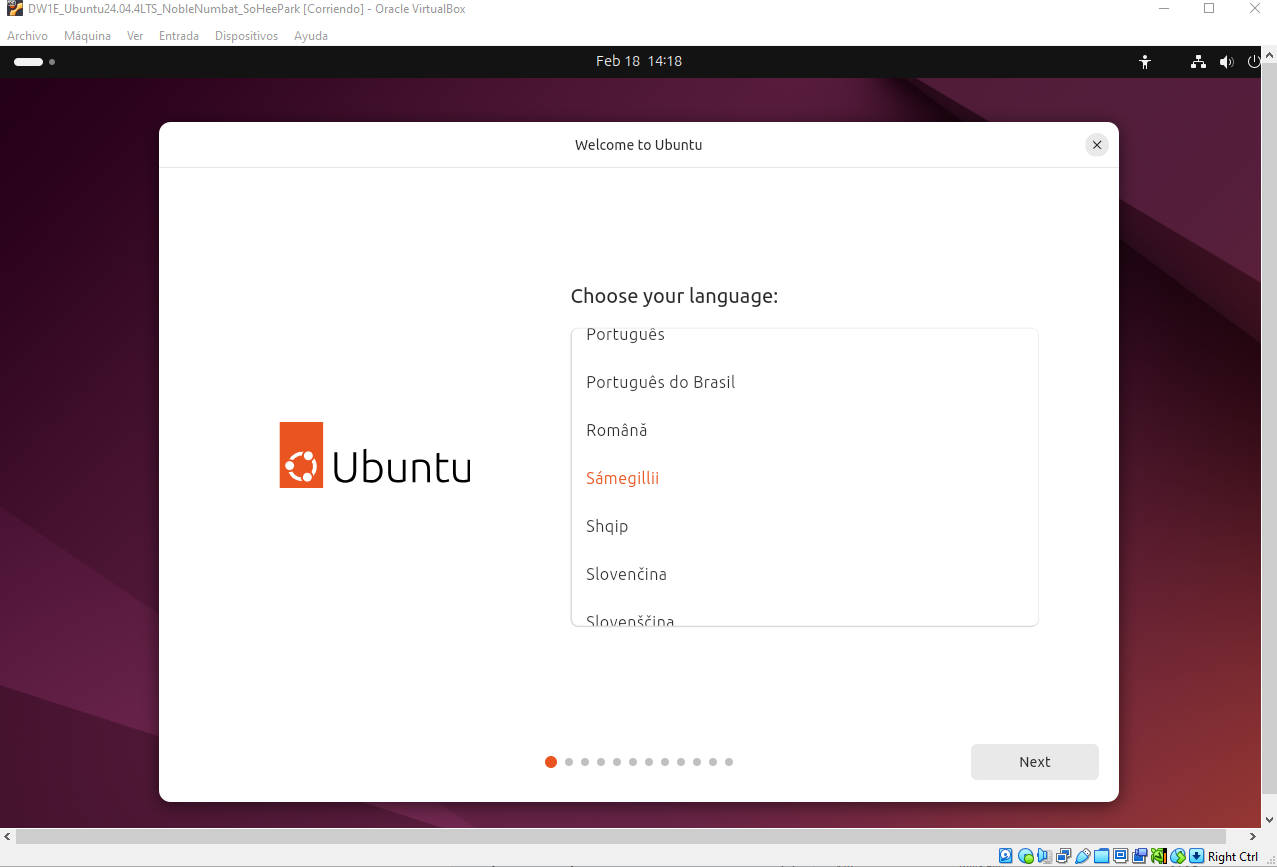
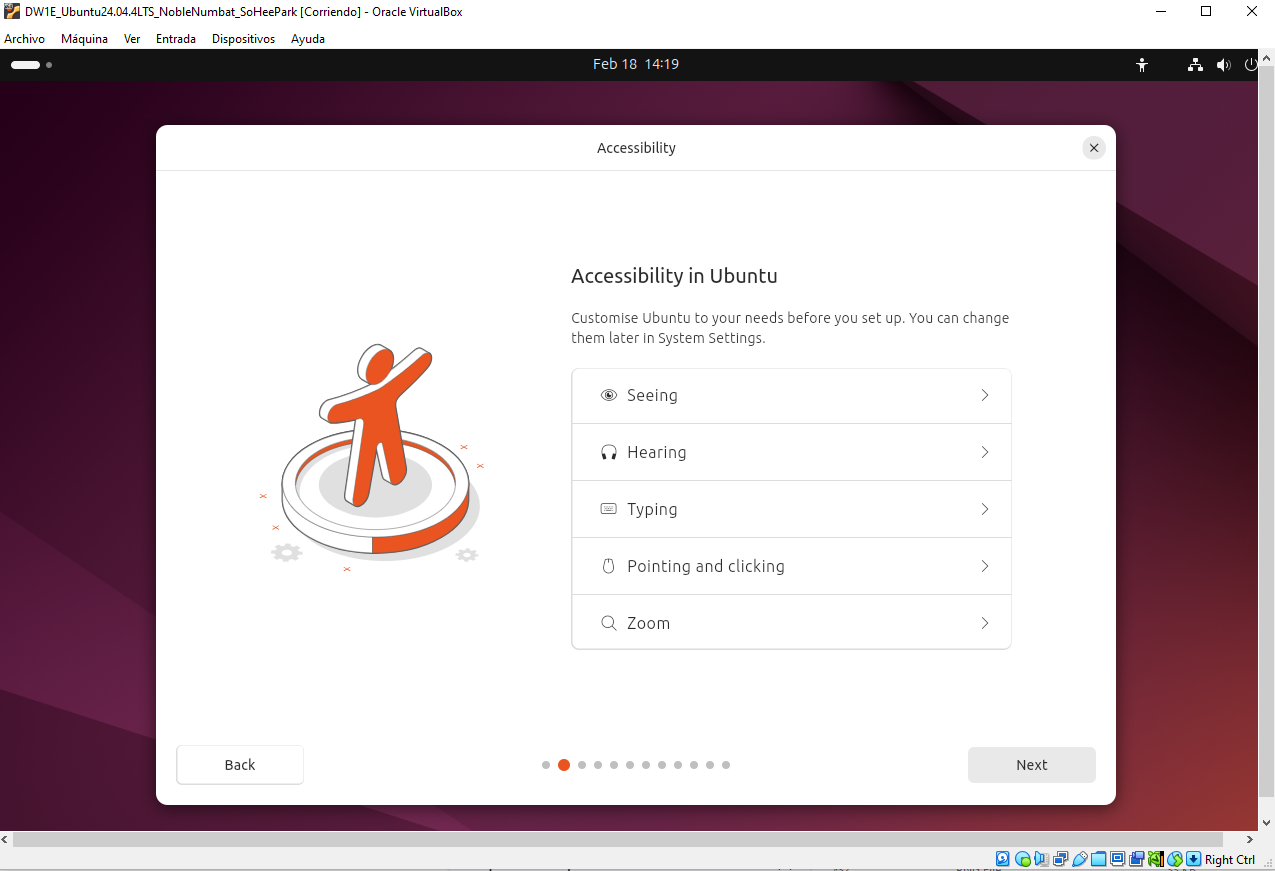
📌 How to install ubuntu(step 1~9)
(1) language: choose english
(2) accessiblity: for users with difficulty, issues
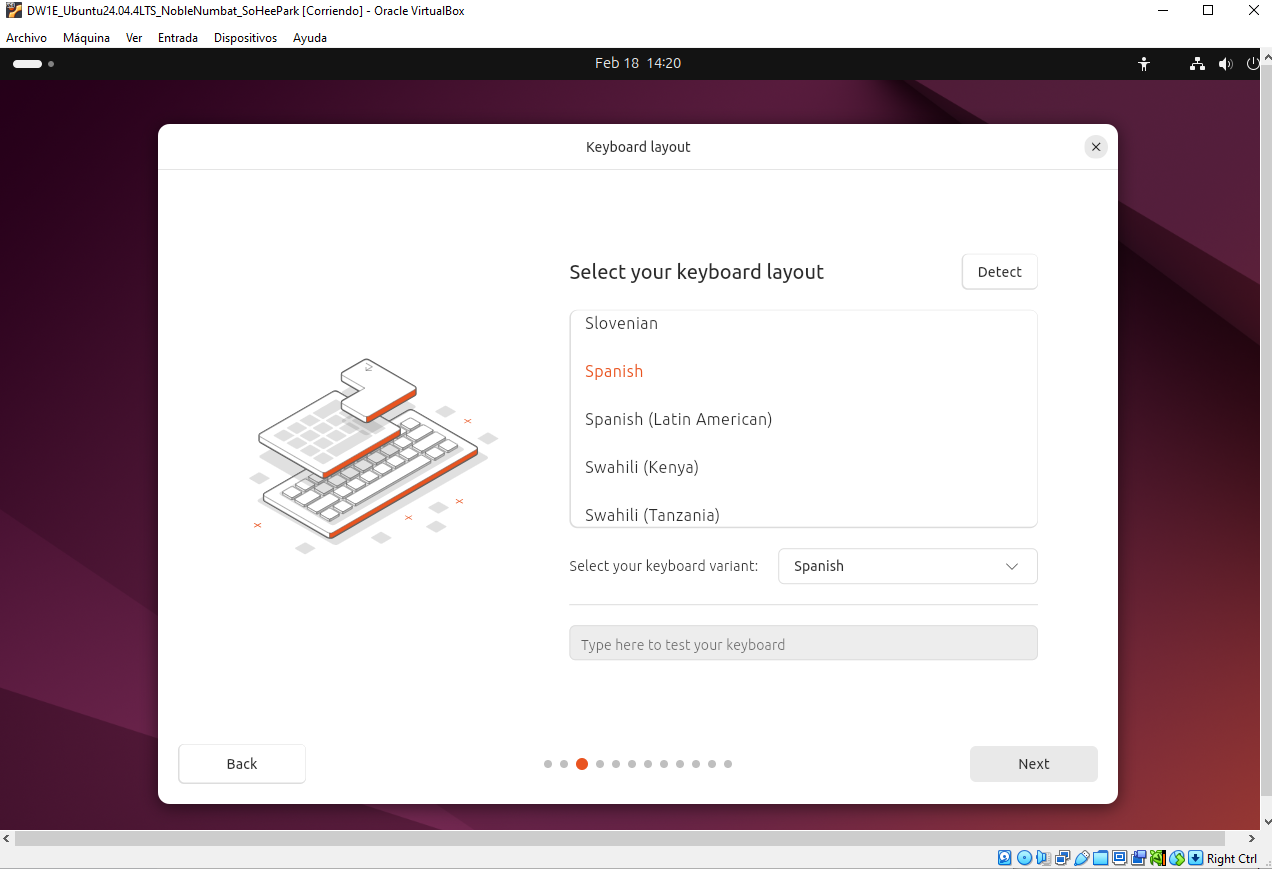
(3) keymap: always try your keyboard, try to enter smth
(4) internet connection:

- internet connetion is recommended for updates,
- do not use
do not connnect❌
(5) choose if you want Live Ubtuntu ot install Ubuntu
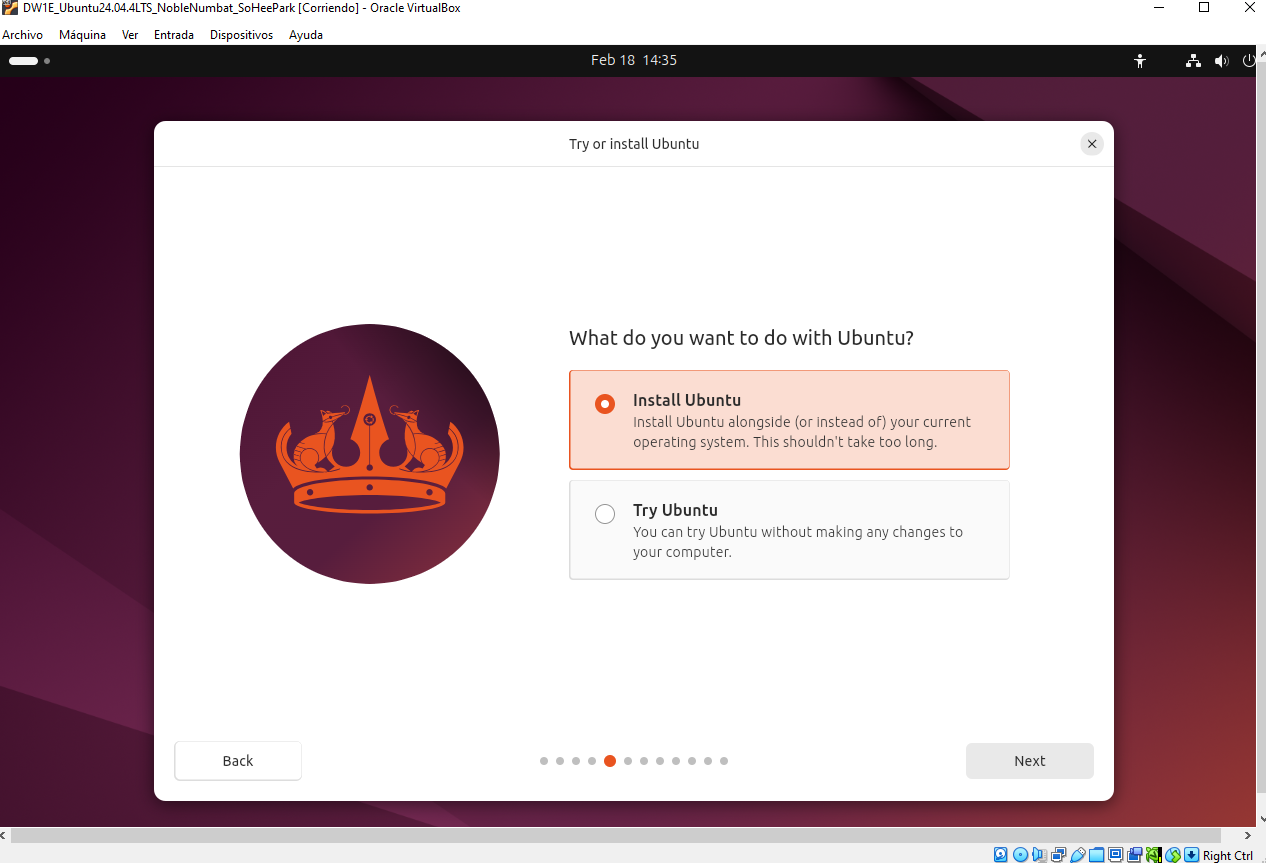
Try Ubuntu: meansLive, do not install, but nothing is saved
(6) choose interactive ⭕️ never automatic installation ❌
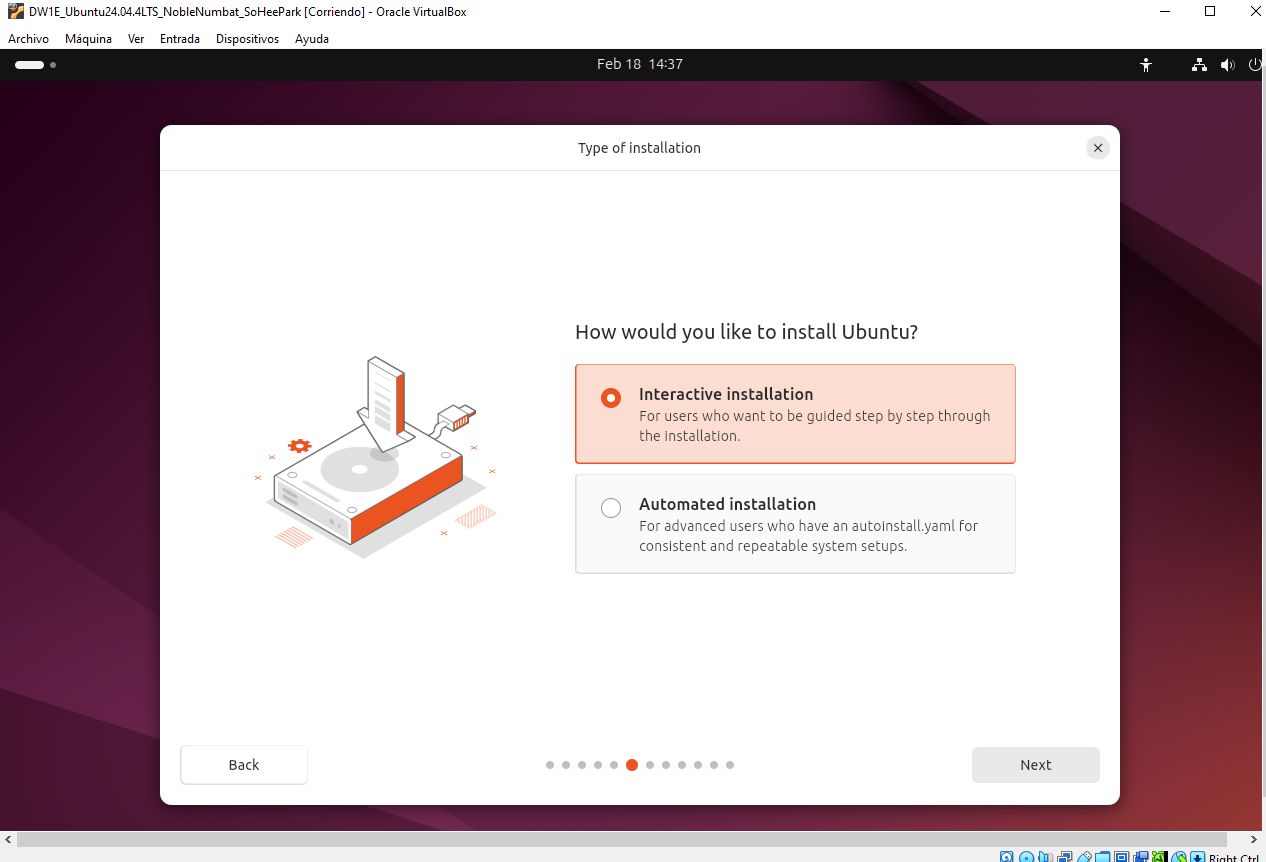
- automatic is creating partitions by default
- if you choose automatic, linux will create only one partition
\(root) - we want distro hopping, swap…so no automatic ❌
(7) which apps to start with? choose defualt ⭕️ never extended ❌
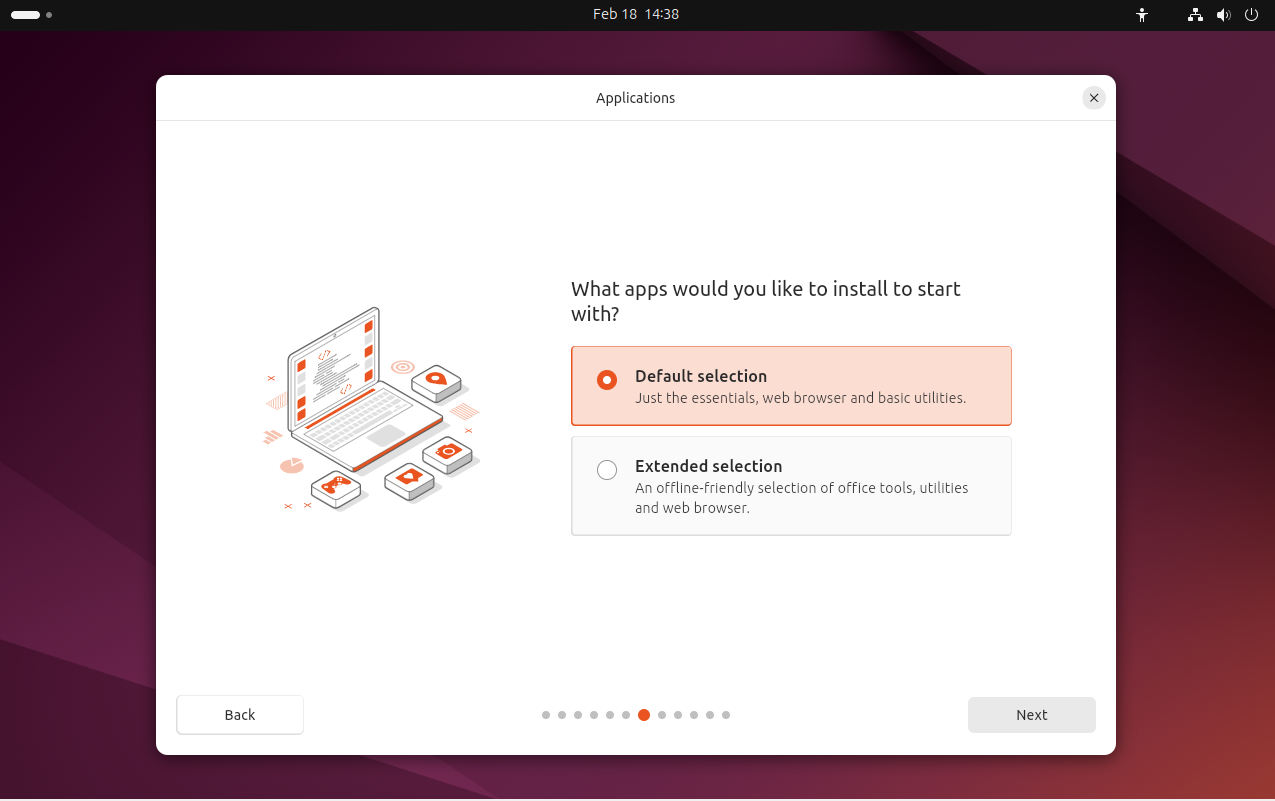
- extended will put all sorts of apps you do not need
(8) Third party screen
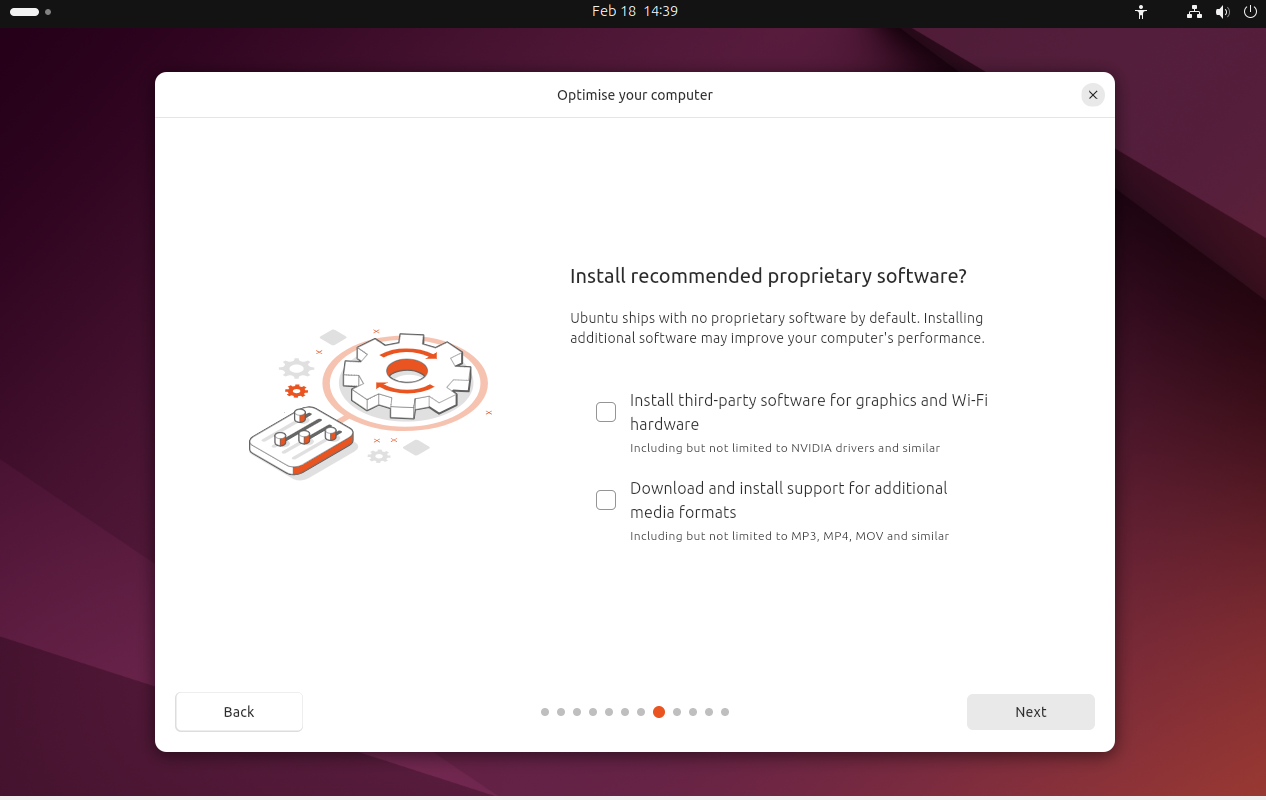
- do not install any third party applications
- unless you are explicitly told to do so
(9) Type of installation: erase ❌ manual installation ⭕️
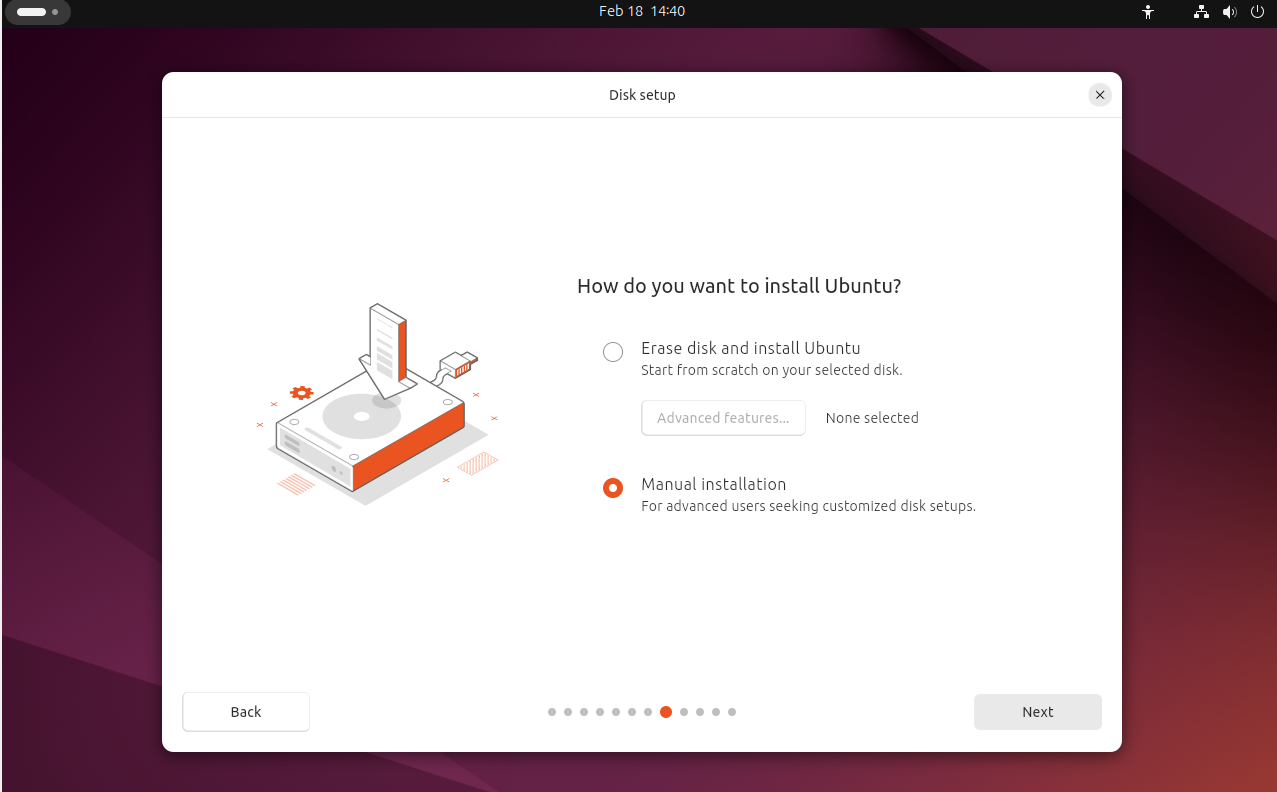
option erase: is the same as automatic installation, creating only one partition- choose
manual installation
✅ Create partitions in Ubuntu
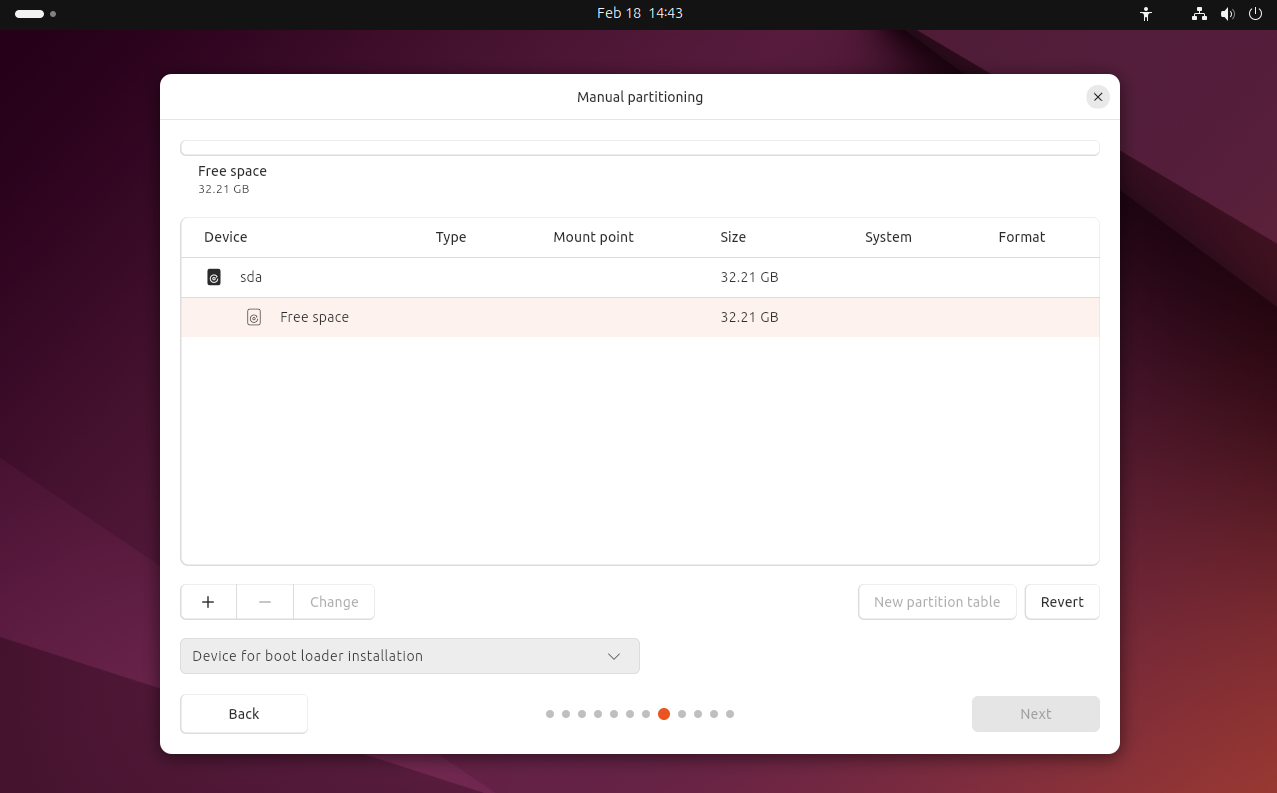
- (1) after choosing manual, enter
GNOME4 GNOME4:GPartEdmodified forUbuntu- in
GNOME4, you do not have to chooseMBRorGPT - bc
GNOME4detects automatically what you need depending on the BIOS
- (2) click on plus to create new partitions
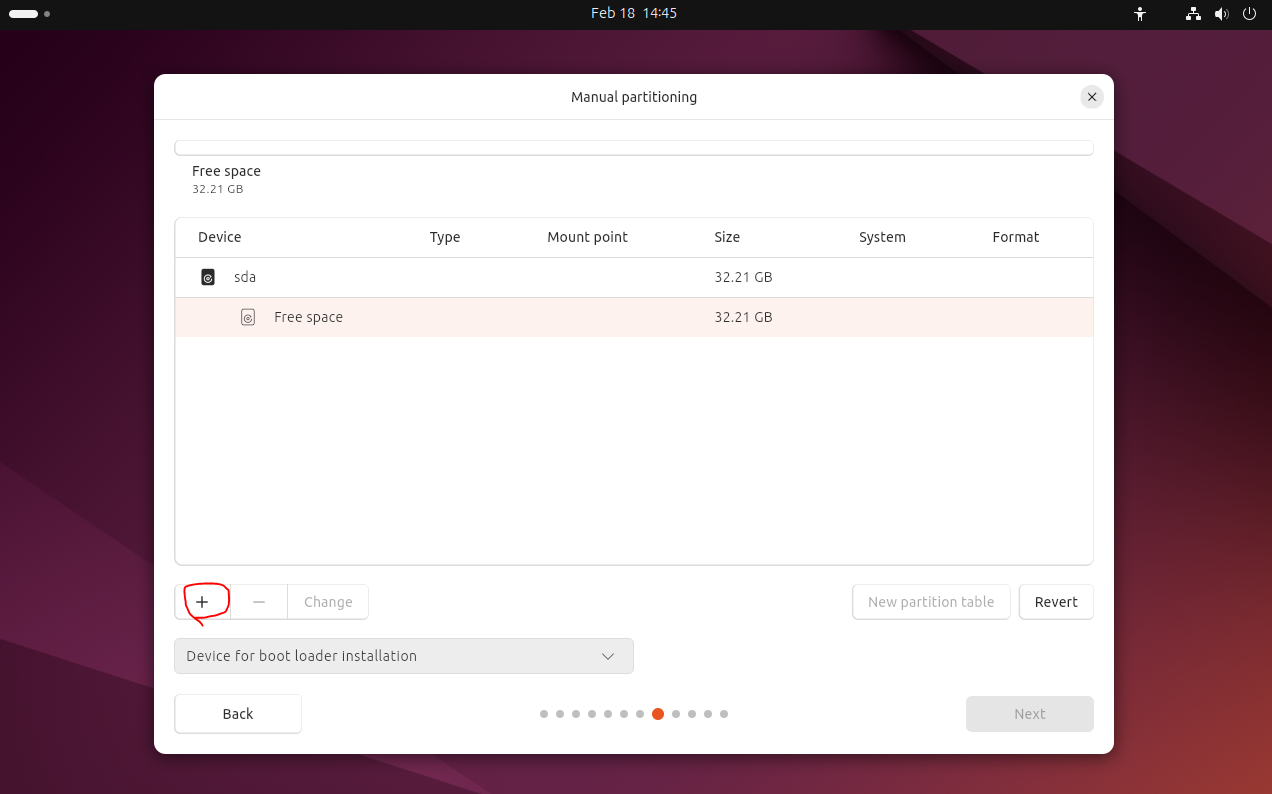
- (3) Ubuntu needs 25GB
- recommend
10GB for data(home)and15GB for the kernel
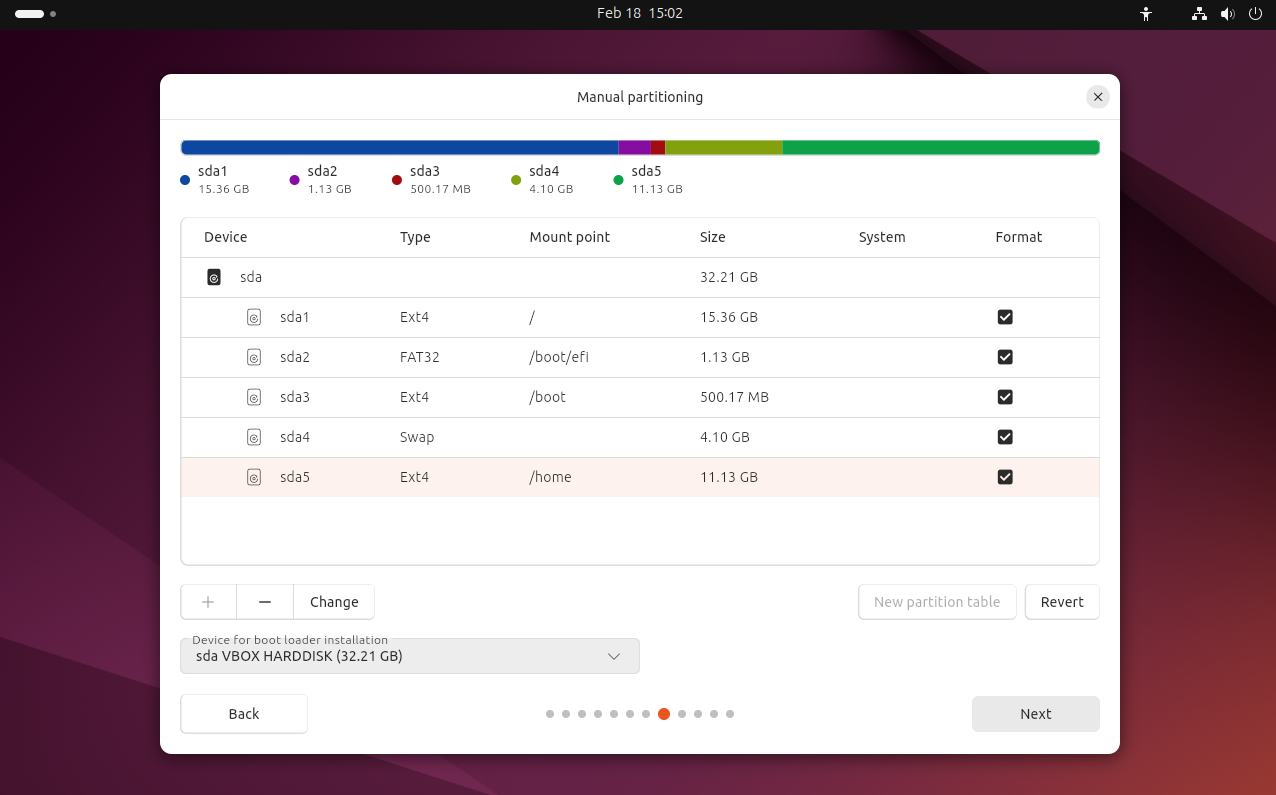
☑️ /root
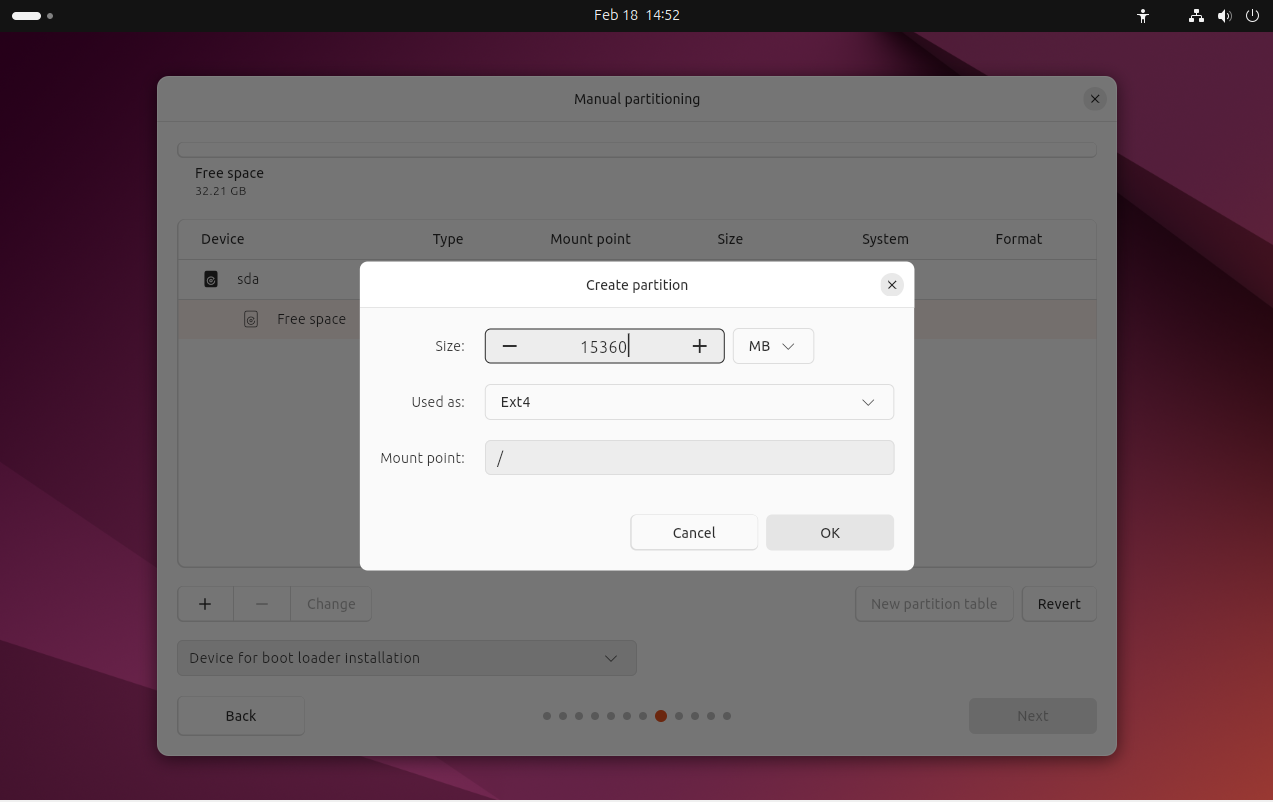
15GBext4Mount point:/
1
2
3
4
5
6
7
8
9
10
11
12
13
14
15
16
17
18
19
What is mounting in Linux?
- we had to click "automontar" for USBs

✔️ In Linux,
    - partitions,
    - devices(camera),
    - drivers...
    - everything
- is only useable/accessible when it is denominated,
- when it has a nickname

✔️ Mountpoint: nickname for that
- without a mountpoint, you cannot use/access it in Linux

✔️ Mountpoints are predefined
/ : mandatory mountpoint of the kernel
/boot : for booting
/home : for data
/tmp : standard mountpoints for folders that you dedicate to temporal files
☑️ /boot/efi
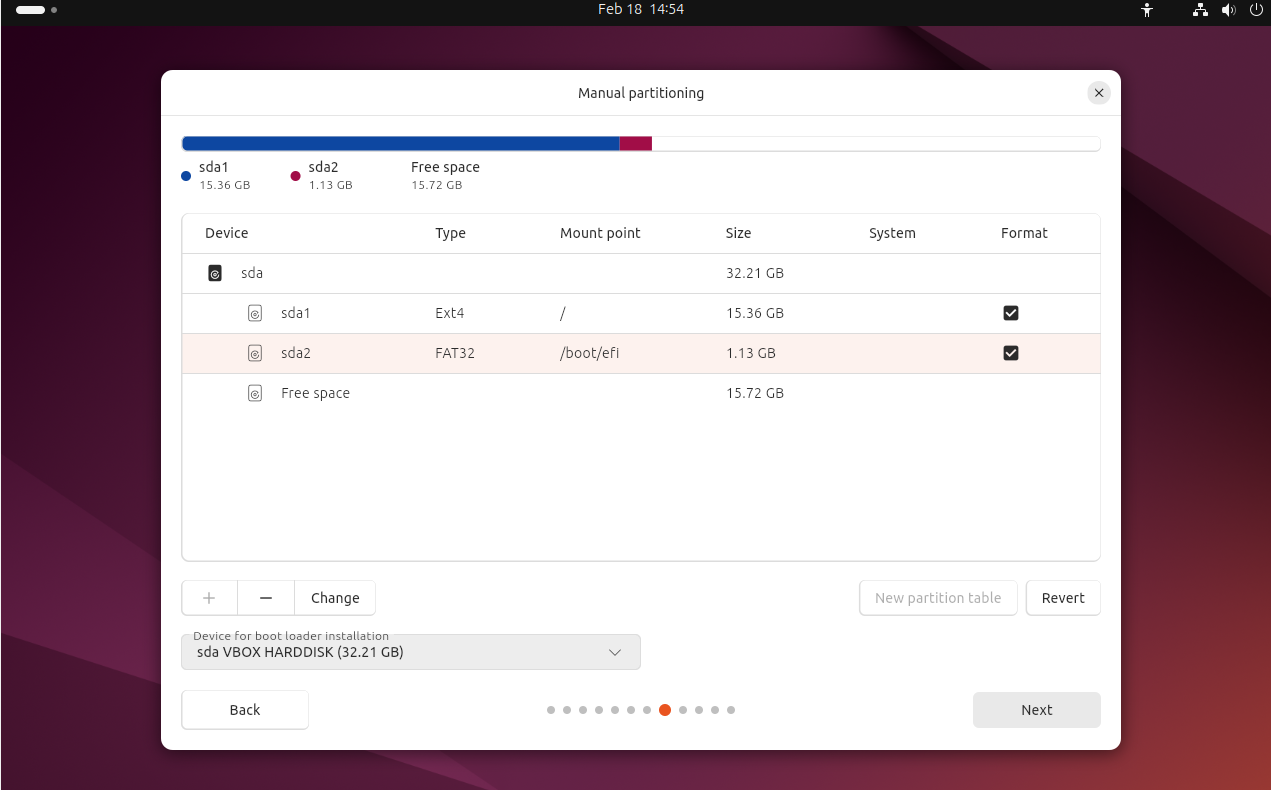
- will be created automatically
- bc we clicked on
efiwhile creating VM - more or less
1GBwill be allocated FAT32: same asefisystem
☑️ /boot
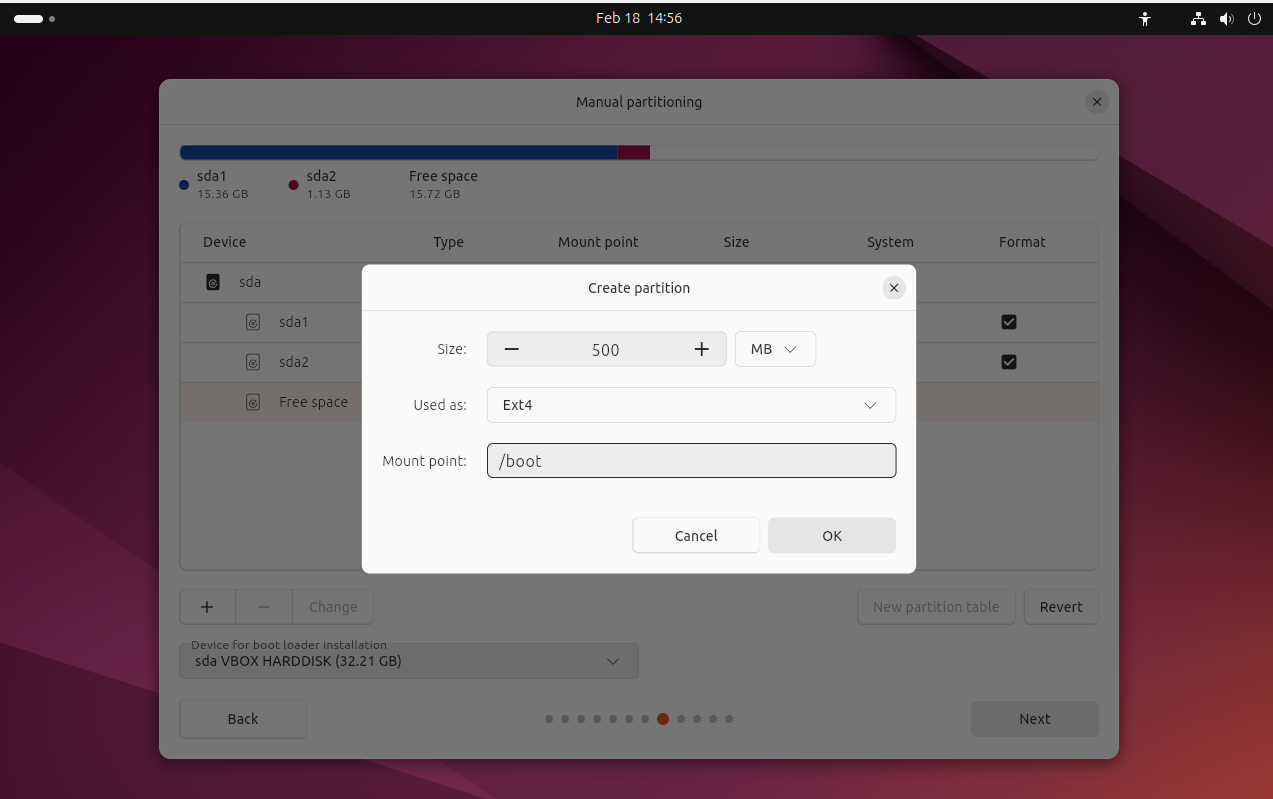
500MBext4Mount point:/boot- also would be possible with
300MB, - but as this machine is only for
Linux, you can make it bigger
☑️ /swap
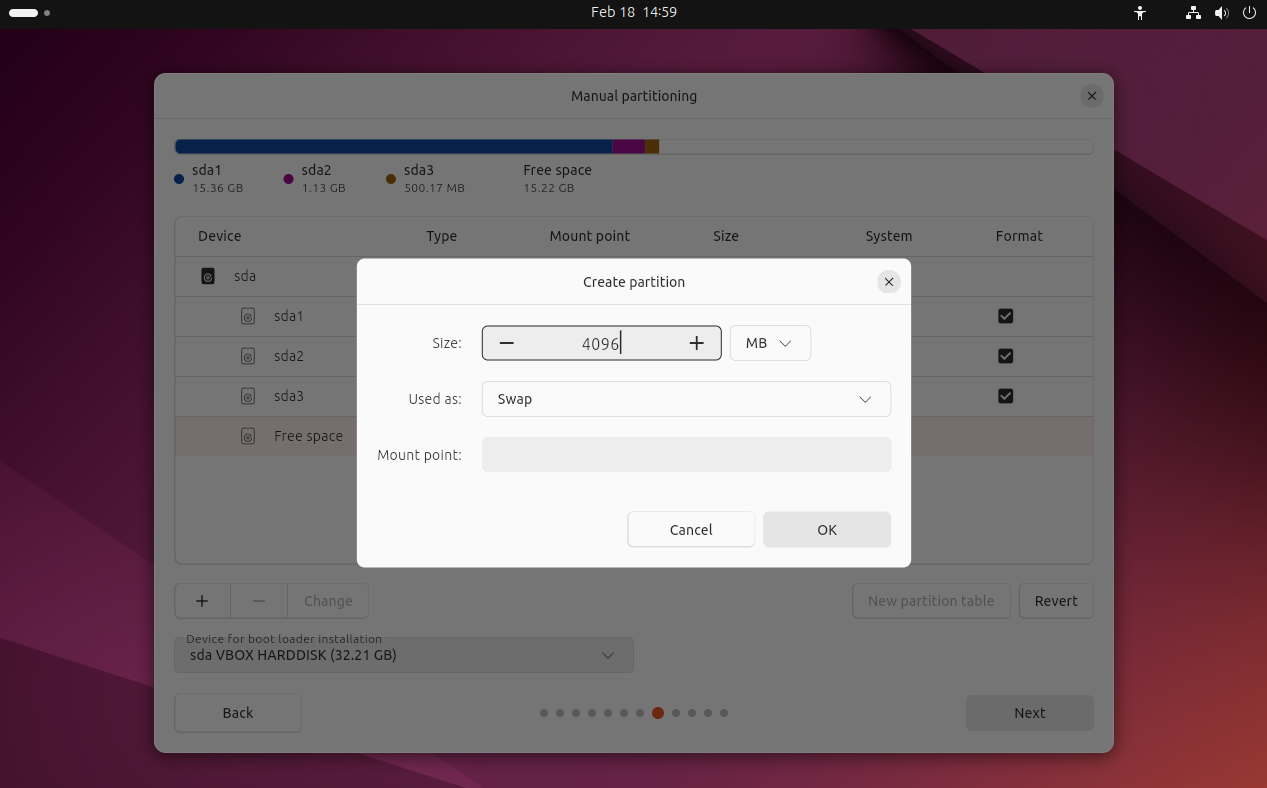
create the SWAP first, then create the
/home- our RAM is
4GB - so swap also
4GB - partition:
used as SWAP - ⭐️ no
Mount pointfor SWAP
☑️ /home
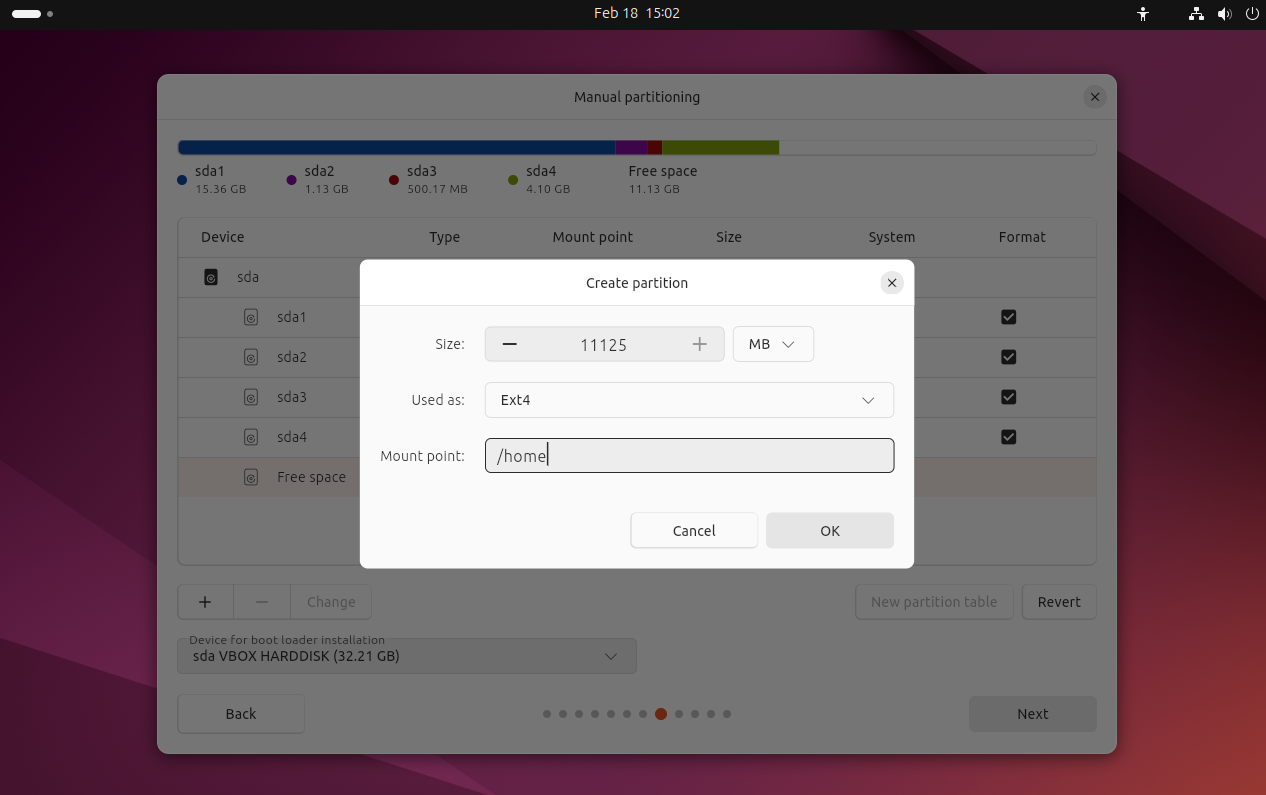
- create the SWAP first, then create the
/home - normally,
/homeis left until the end so that it can have all the remaining space after allocating the SWAP
- all the left space
11125MB ext4/home- free space is totally until you format it
☑️ final
💡 GRUB
- 1️⃣ if we have efi
GRUBwill be automatically stored in/boot/efi- 2️⃣ if we had lecagy BIOS
- if we didnt click efi,
- then
GRUBwill be stored in/boot
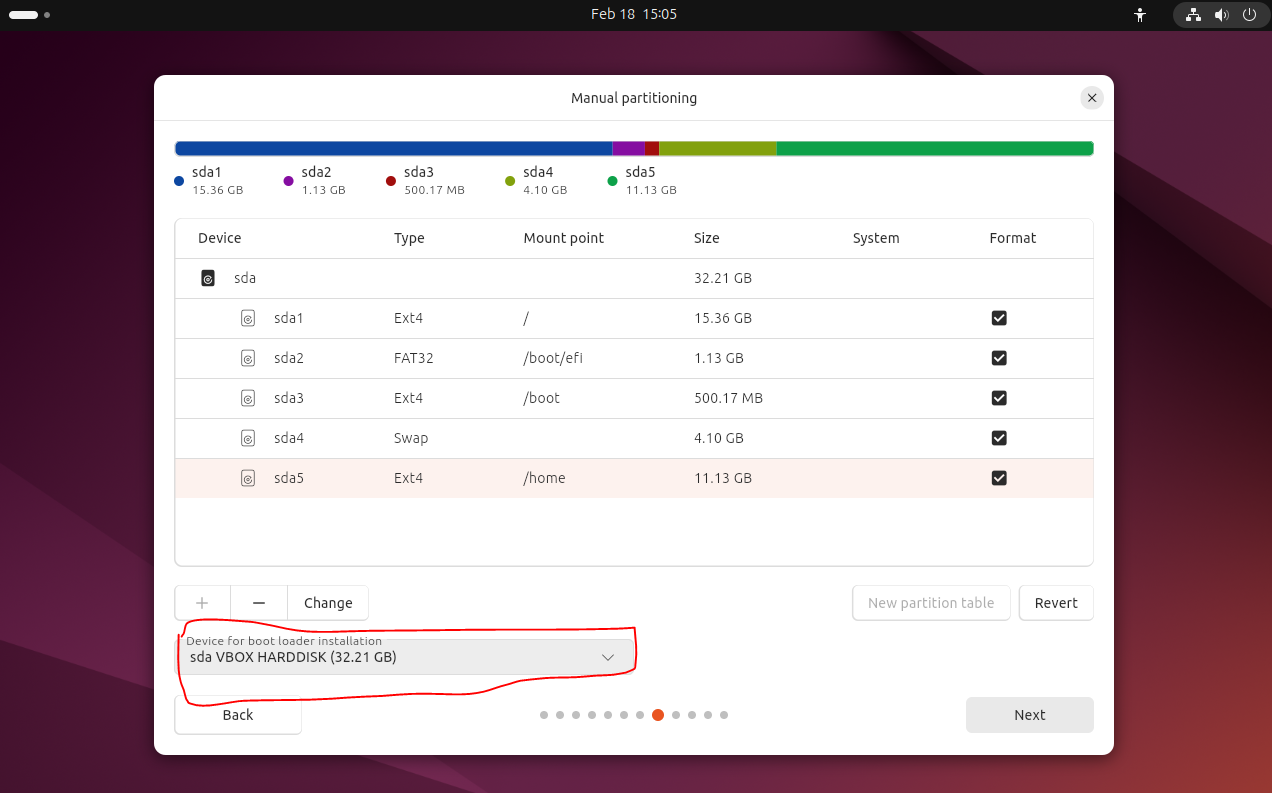
- we need to confirm that the
GRUBwilll be installed - in the same disk as
/boot/efi - as
/boot/efiissda2, the disk that it will be stored issda - so,
GRUBwill be stored insda
📌 continue installing Ubuntu…(step 10~16)
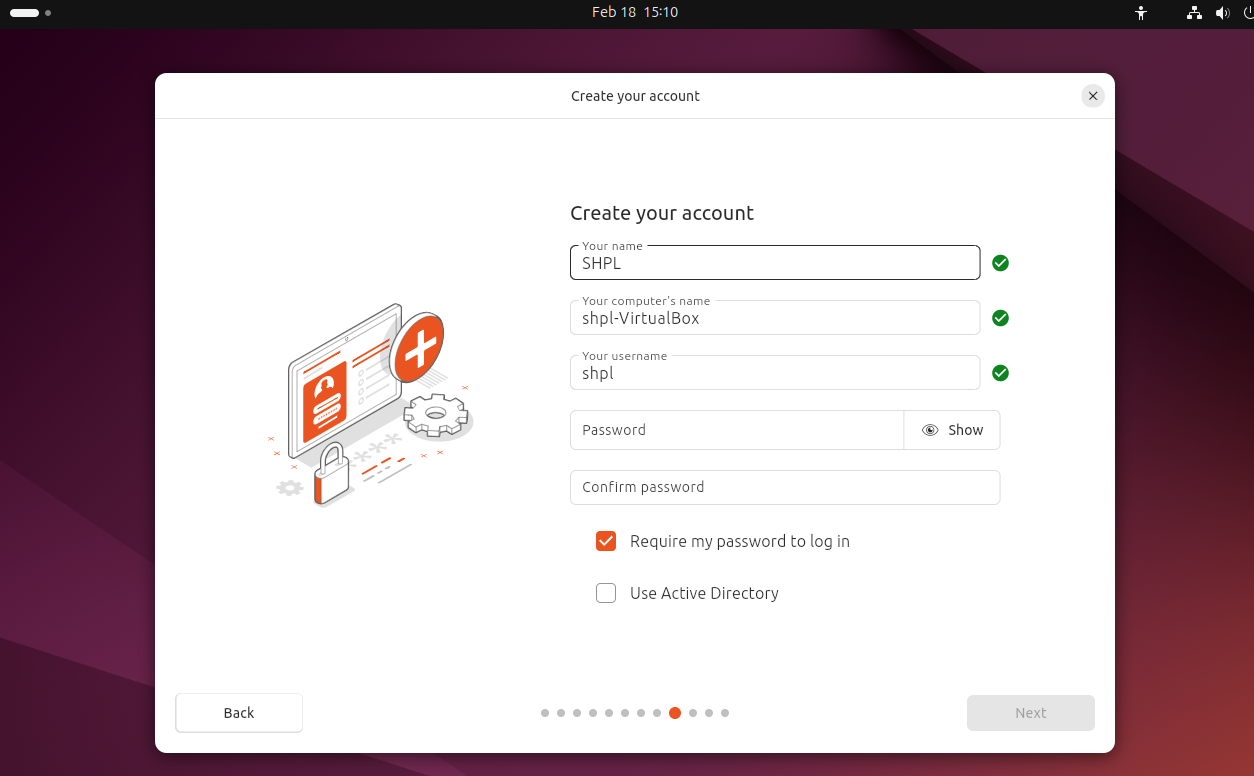
(10) Your full name
- name of the installer
- not technical name ❌
- recommdended: your initials in capital letters
- 👀 SHPL
✔️ Concept of super user
- the
installeris anadministrator - ⚠️ but, NOT the
super user super useris theroot user, known assu- and
super useris not a phisical user, its a virtual user - the
super userhas all the permissions super usercan even distroy theadministrator- you can take the role of the
super userif you want - ⚠️ But not recommended
- better to be
not super user - and ask the
super userto do things for you - 👉🏻 use
sudo...to do things that I do not have permissions for
(11) computer name
my name from above in lower letters-name of computer- in VM, name of computer is
VirtualBox - do not modify, leave as default
- 👀
shpl-VirtualBox
(12) user name = technical name
- for login
- same as full name, but not capital
- this is the technical name
- do not modify, leave as default
- 👀
shpl
(13) password
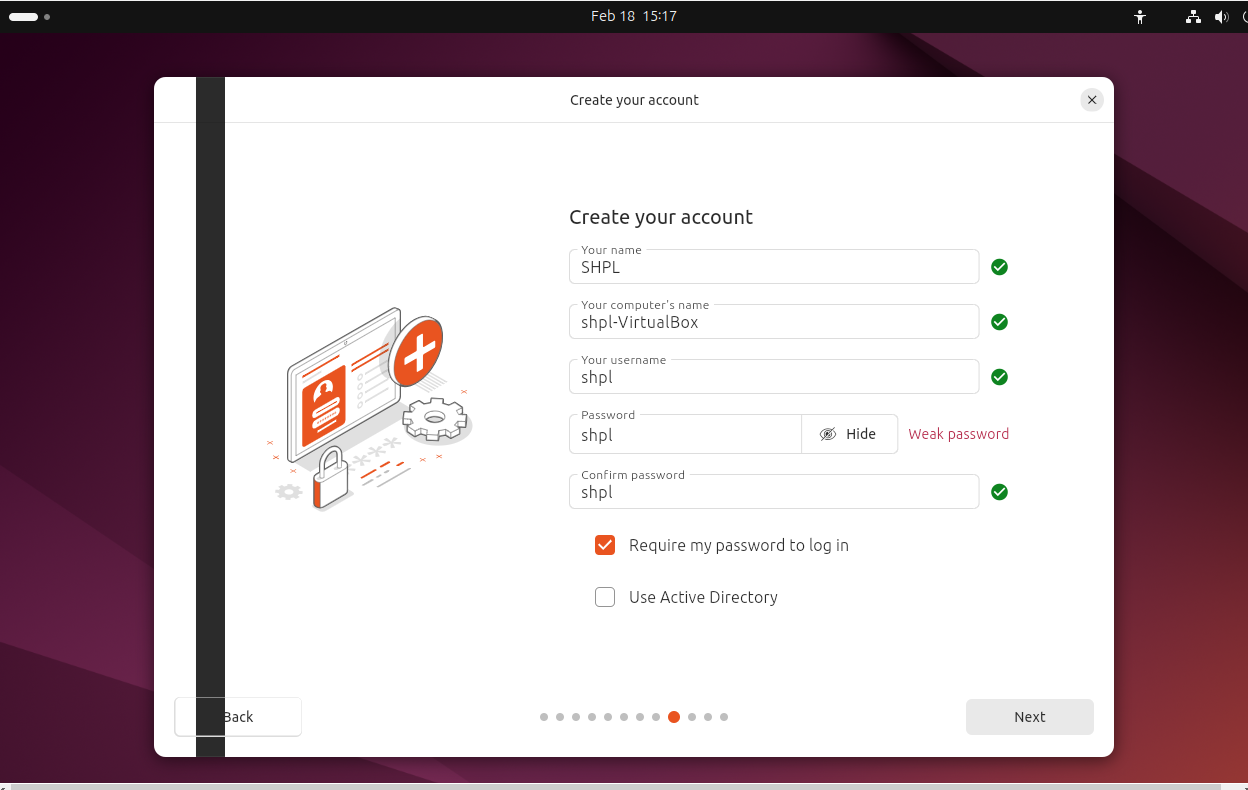
- in the initial installation,
- it is typical to choose as inital password as same as logging
- so same as technical name
- 👀
shpl - check
Require my password to log in
(14) Do not tick Use Active Directory
(15) Choose timezone
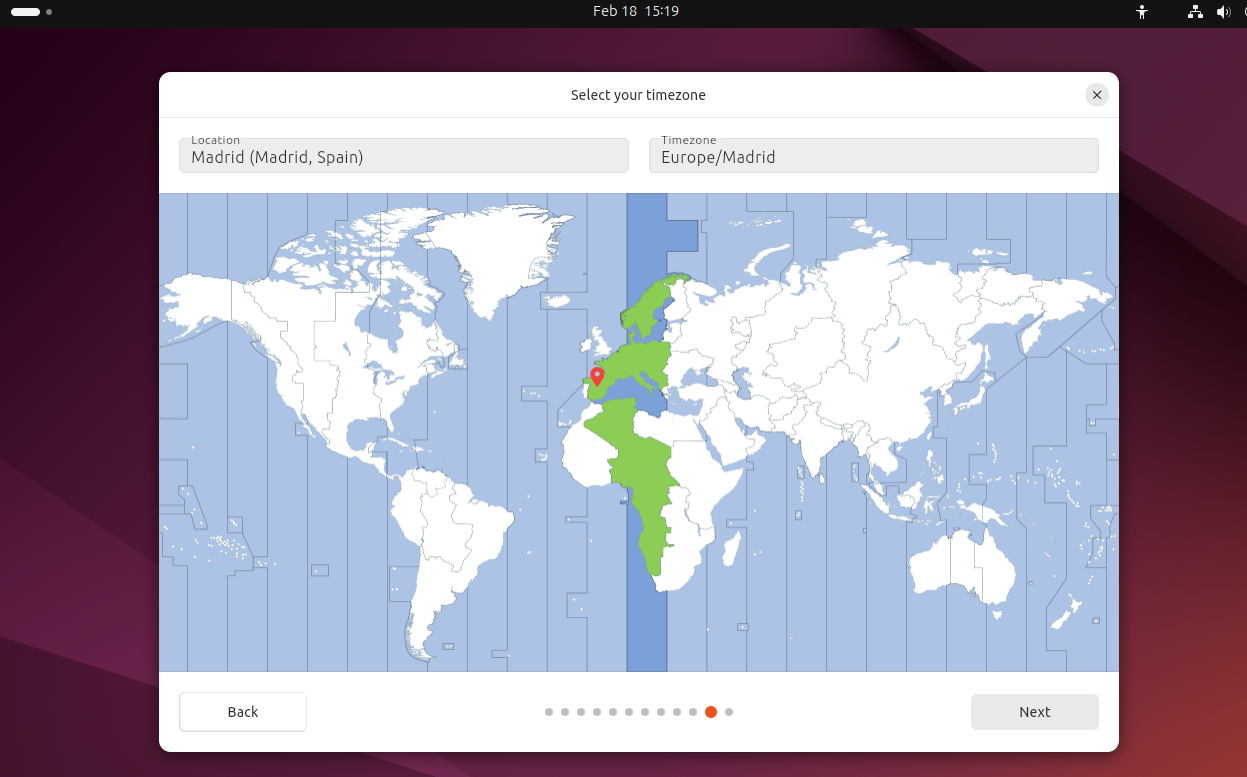
- modify it to my timezone
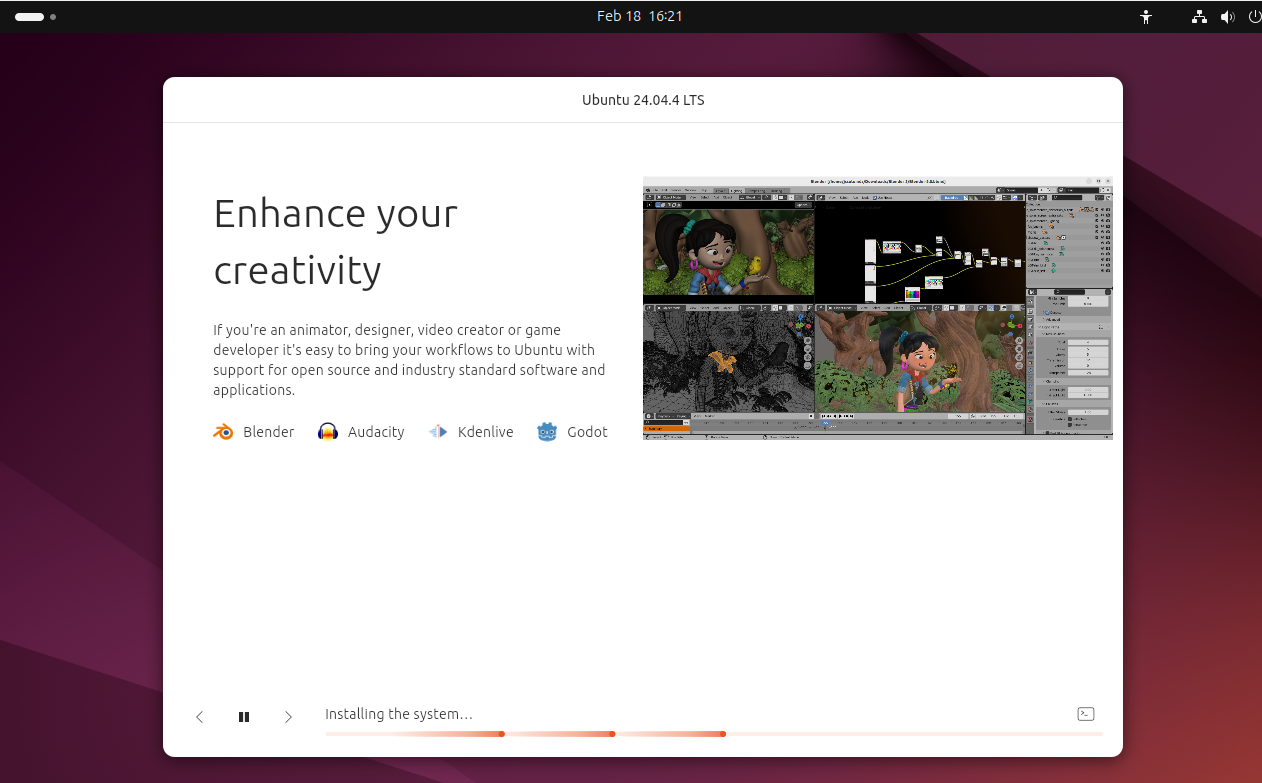
(16) final page
- never switch the VM off now
save state: frozen ➡️ big error- you can only use
save state - after the message
installing the system - freezing the machine now can break the machine
- when the
installing the systemmessage is over, then you can freeze
- and after finishing installation
- mandatory to
restart
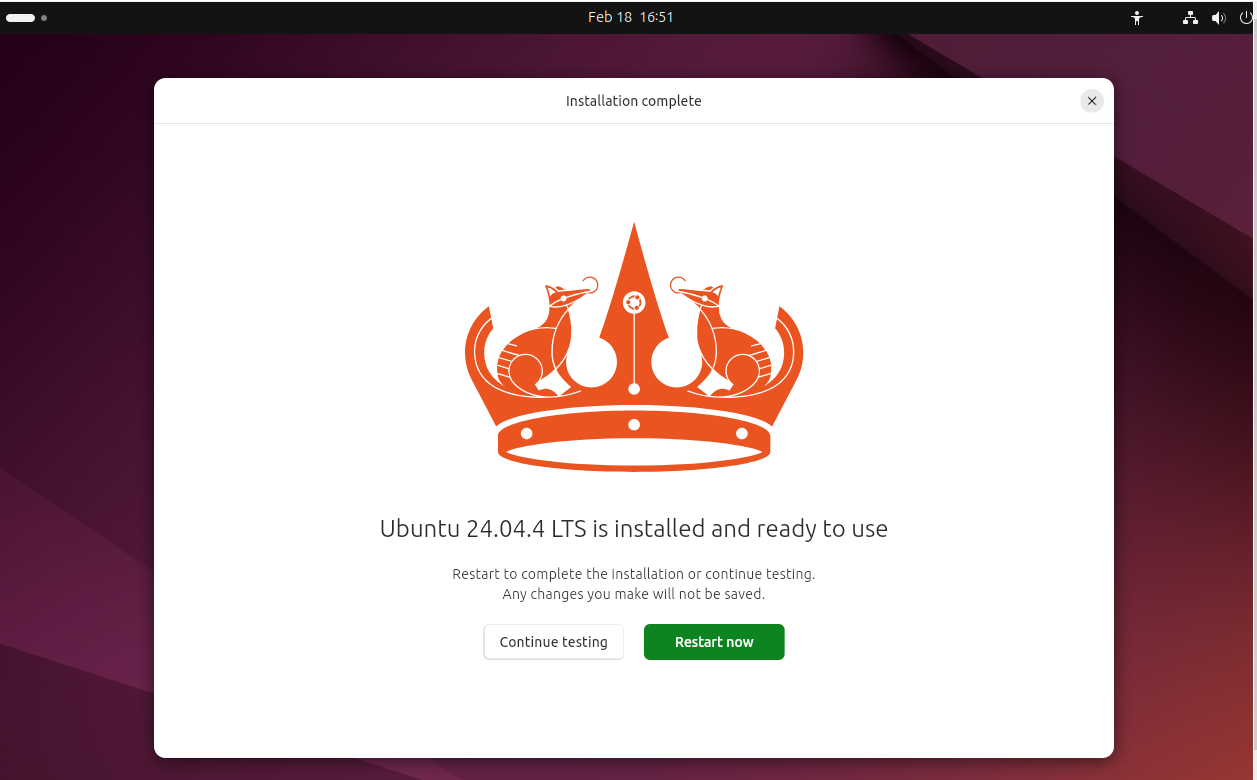
- when when you
restart it is mandatory to extract the
iso- when you restart,
- you will see the full name
SHPL the technical name is secure, will never be shown
- when you fill in your password,
- then press enter
💡 Graphical issues solution summany
- for initial setting use
VMSVGAand3D - if there is a problem with VM installation, and your windows do not appear use
VBoxVGAand eliminate3D - if the mouse disappears, use
VBoxSVGAorVMSVGAand3D - 👉🏻 you can
togglethe settings, when they do not have a fixed solution - toggle: setting that is not stable, has to be modified depending on the situation
1
2
3
4
❓ Explain how the graphic toggle works in Ubuntu
- when you first install, use VMSVGA and 3D
- if there is a problem with VM installation, modify the settings to VBoxVGA and disable 3D
- if the mouse disappears, you should use VBoxSVGA or change back to VMSVGA and 3D
✅ Important steps after the first login
(1) Welcome page
(2) Ubuntu Pro: Ubuntu with lots of extra in /opt
- do not upgrade now, skip
(3) Improve ubuntu
- two ways of making community improve
- (1) not sharing
- (2) sharing only basic feedback: all the
/syserrors are sent to the Linux company canonical - (3) sharing all feedback:
- if we share all the feedback, all the
/sys,/profwill be sent to canonical - in windows, share only basic feedback
- in linux, good practice to share everything
(4) GNOME flavor
- Ubuntu 24 has
GNOME 4.6 the apps button is a circle now
- The first thing that the technician has to do
- is search the command terminal
- and add to favorites
✔️ Pin the terminal

- click on apps
- search terminal
right click, pin to dash
- when we run in terminal
- 🟰 it means we are running it in the shell
🟰 which means, all the commands are checked by
super user- 🆚 if we run outside the terminal
- by using visual buttons,
- this is for standard users
- these buttons are not shell protected ❌
buttons have many less functionalities, for standard users
- visual buttons require graphic power
- 🆚 but the terminal does not require graphic power
- 🟰 the terminal will always work, even when graphic resources are limited
✔️ The terminal has level 0
- the terminal has a
run level 0: top priority - so linux always gurarantees
- even when all graphics, buttons fail
the terminal will work
- If we stop all the run levels greater than 0,
- when you are paralyzing all the buttons
- which means you can only use the terminal
- which means you are limiting the use to only technitians
- and limiting standard users
✔️ BASH
Bowne Again SHELL
- Bowne: best friend of Linux
- in every linux, the command shell is normally named after a person
✔️ Prompt
the commands line is called
prompttechnical name@computer name:my directory$
shpl@shpl-VirtualBox:~$
shpl: technical nameVirtualBox: computer name~: my personal folder, my portion in/home$: if I am not superuser#: if I am useruser- 👀
shpl@shpl-VirtualBox:~$ - means I have logged in as shpl
- who am I? shpl
- I am connected to machine VirtualBox
- I am located in
/home/shpl and I am not a super user
- 👀
root@MERCURY:/root# - I am super user
- I am connected machined called MERCURY
I am in
/root, which is my personal folder as super user- ⚠️ If you see
#, logout
📌 Guest Addtions installation
- once the VM OS is istalled
- we should install GA
- two ways of installing GA
(1) graphic modeand(2) command mode - command mode is recommended
- as graphic mode requires a lots of graphic
- so only follow graphic mode when you do not have graphic issues
- and you can give lots of graphic resources
- VRAM 256MB
1
2
❓ Why did you install GA in command mode?
- bc we have to give VRAM of 256MB and we cannot
☑️ Install GA in command mode
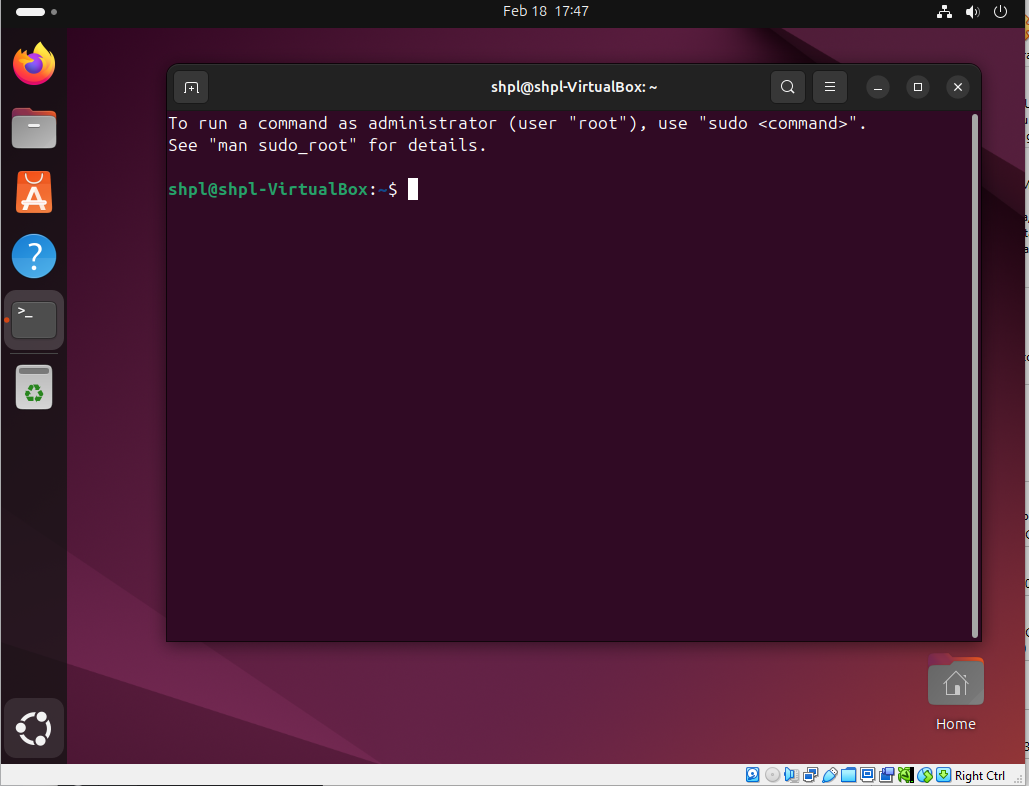
(1) Devices > insert guest additions
- when you click it, a CD should appear
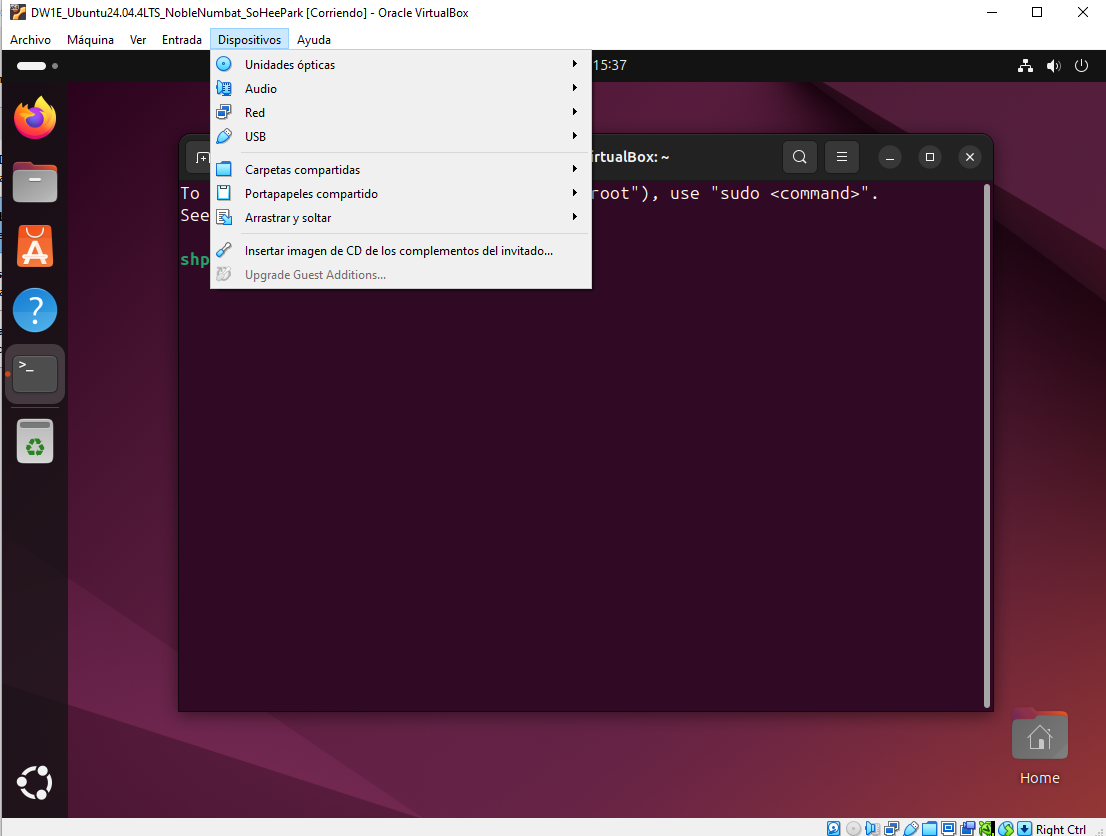
(2) Write down GA version
- the version of the guest addition we are installing might change
- bc the GA depends on the
iso - so you should keep recrod of the guest addtition
- ⚠️ this is case sensitive ⚠️
- 👀
VBox_GAs_7.1.10
(3) Where is my GA?
- In which folder the information of CDs are stored?
- CDs and USBs are linked in
/media - inside the
/media, there is afolder for my user - 👀 and inside the
user folder, the CD will be located /media/shpl/VBox_GAs_7.1.10
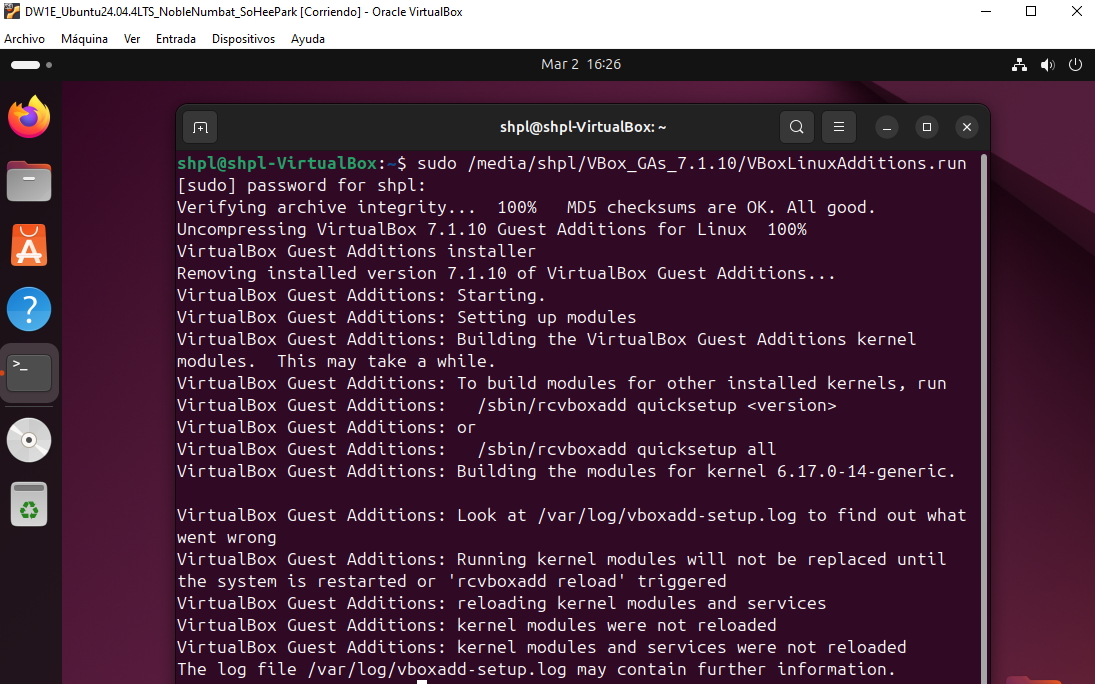
(4) Execute in terminal, run application
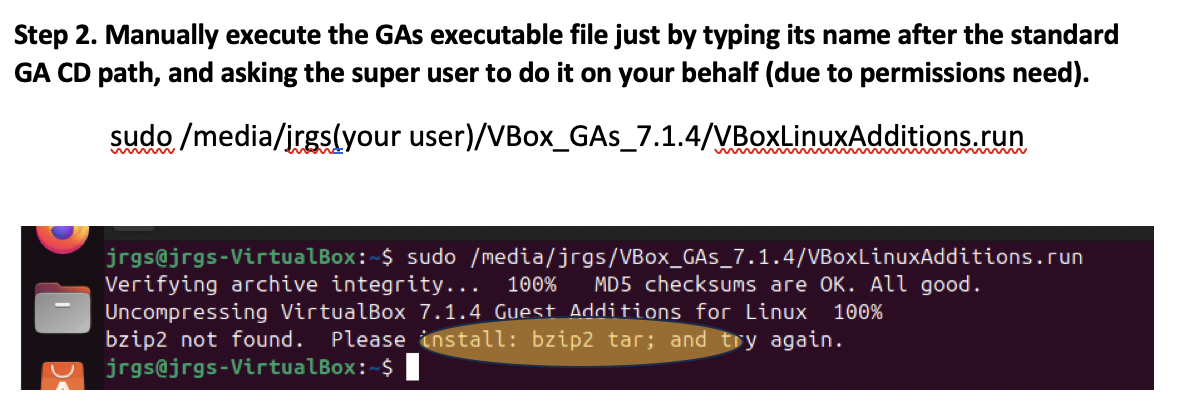
- then execute from that CD you have inserted
- inside the folder
/media/shpl/VBox_GAs_7.1.10 - the application named
VBoxLinuxAdditions.run - you need administration permissions
- 👉🏻 use
sudoand ‼️ add one spacebar ‼️ - run
sudo /media/shpl/VBox_GAs_7.1.10/VBoxLinuxAdditions.run
- and everytime you run
sudo, - it will ask your password
- type for password
(5) 🔴 Will see error packages not included
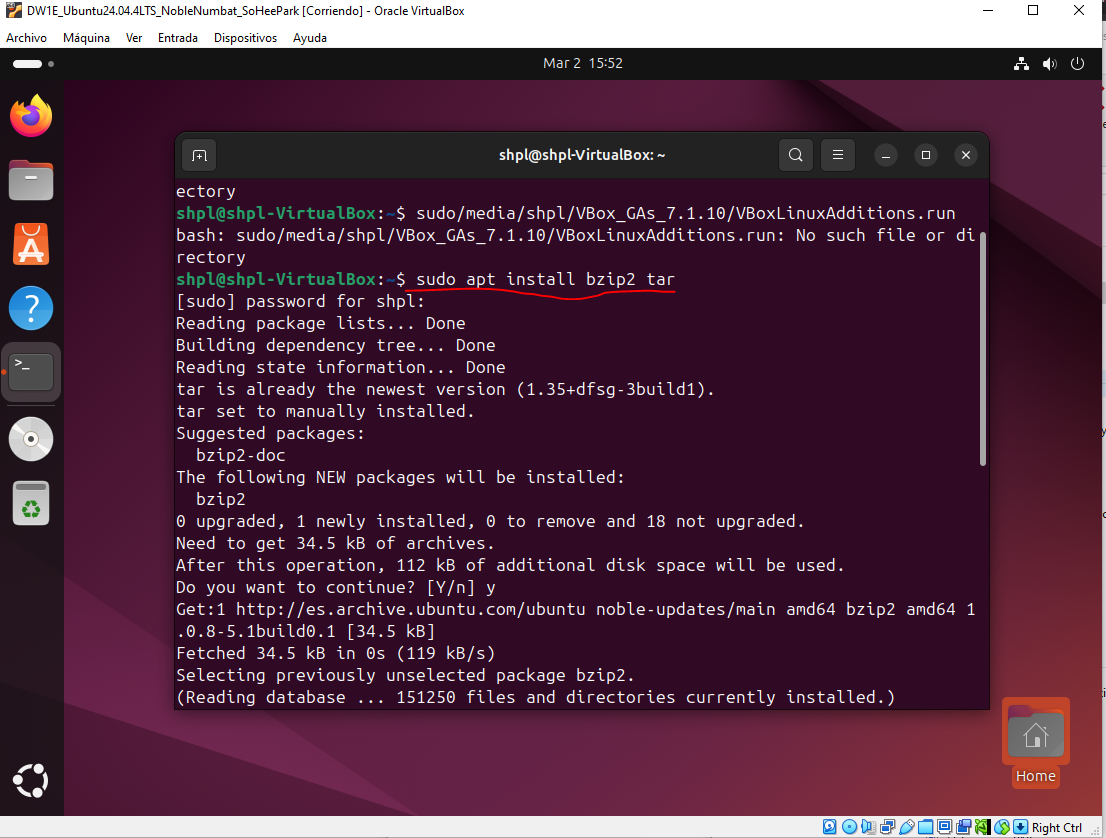
- there are two packages that you need
- but that are not included in the GA
the two packages are
bzip2tar- these two packages are necessary to decompress the GA
- for unzipping the GA
- 💊 to install two packages
- run
sudo apt install bzip2 tar aptis a package of installers- ‼️ internet connecetion is neccessary
1
2
❓ Why cannot I install the packages?
- bc you do not have internet
❓ What happens if there is no internet connection?
- If there is not enough IPs
💊 change to NAT, do not use bridge
apt -getis also possible for installing things- but old fashioned
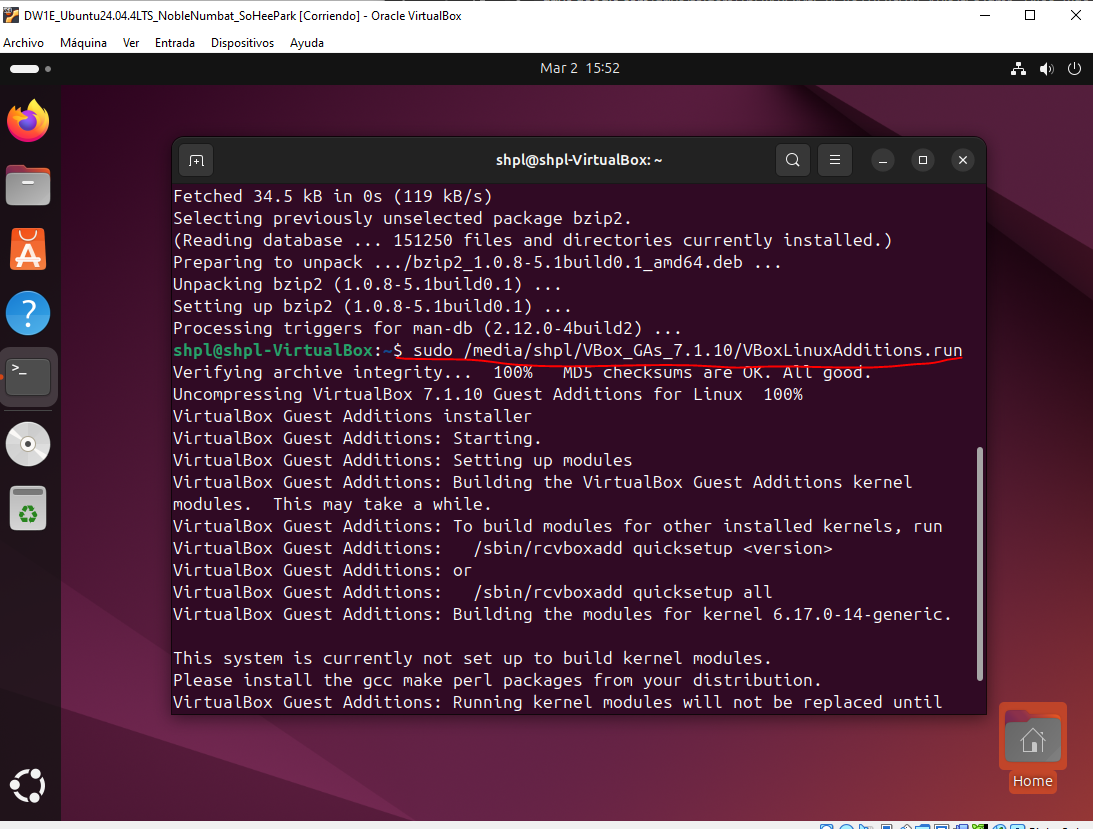
(6) 🔴 But even after installing the packages, you might get an extra error
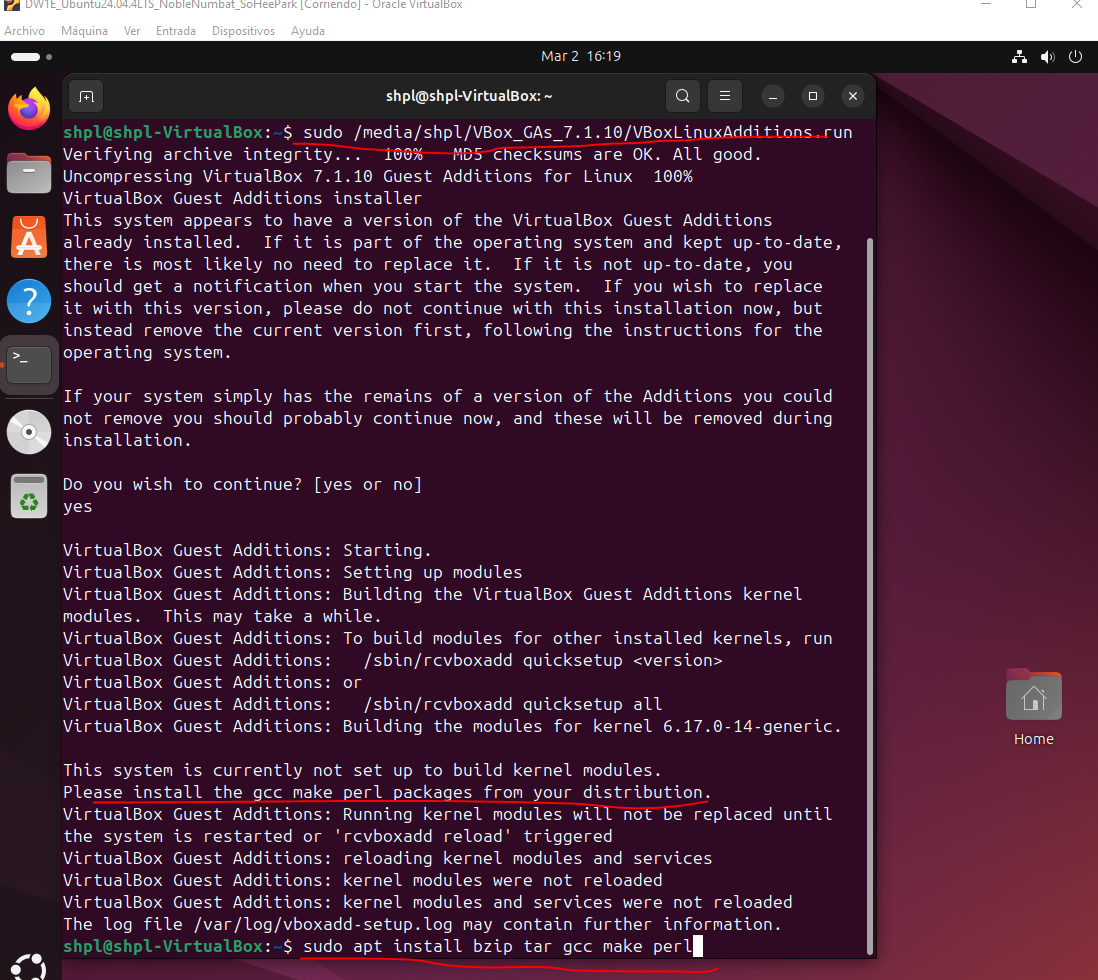
- 🔴 the extra error:
gcc make perl packages missing means the kernel modules are missing
- the
perl, make, gccis for creating link - between my kernel and the users servers of the hybrid OS
- hybrid OS has
kernel + user services(extra commands for extra things) - in order to make users servers work
- we need three packages
gccmakeperl👉🏻 These three packages are called
Kernel modules- 💊 install
sudo apt install gcc make perl
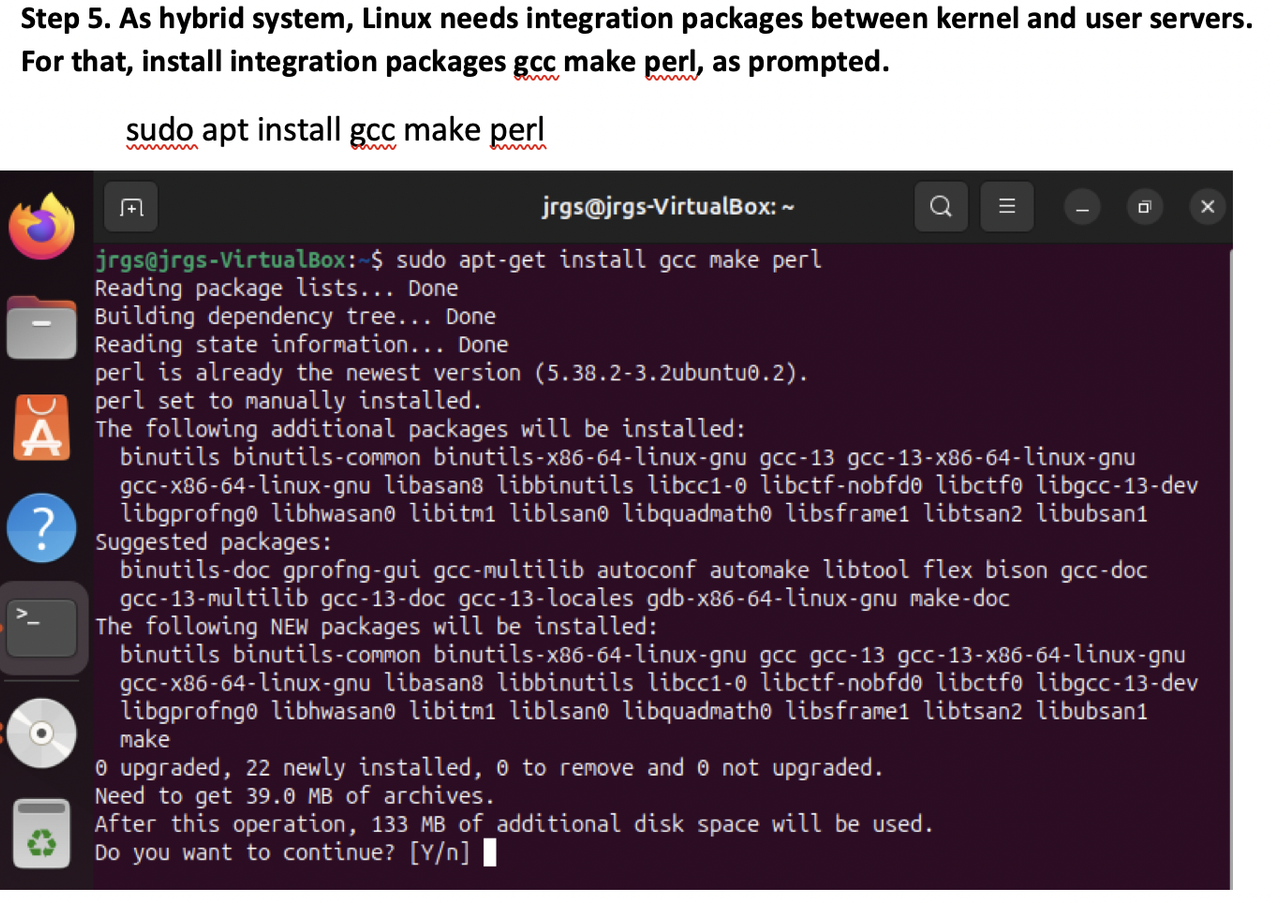
- even if you had it installed
- you can install again
- no problem
(7) if you have Error with E(optional)
🔴 If you get an error starting with an
E- it means you have a weak internet connection
- 💊 use stronger internet
- 💊 or download it in another place
💊 change to NAT
- or the need of updating your system
- 💊 update using commands from step 8
(8) After installing smth, update
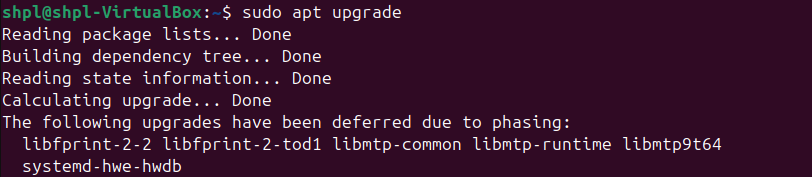
sudo apt updatesudo apt upgrade- link perfectly all the commands you have just ran
💡 Summary of installing missing packages
sudo apt install bzip2 tarsudo apt install gcc make perlbzip taris for decompressing GAgcc make perlis for linking to the kernel- when we download the GA
- we download basic version in kernel
then we download optional repositories
- then after installing
- run
updateandupgrade updateandupgradecreate link/dependencies between commands
📌 continue Guest Addtions installation…
(8) restart/reboot the system
- sometimes you get a reminder to restart
- but after installing everything, just restart
sudo reboot
(9) Now, retry the installation of the GA
- sometimes you have to install two times
- bc of missing dependencies/links
(10) test 1: Test GA
1
2
3
4
GA can do three things
- Host + F
- shared folders for USB between VM and RM
- Bidirectional
- with
Host+F, maximize the window and make screenshot with
Host+E- full screen with
Host+F
- 🔴 if when taking screenshot, the screen blinks, and gives you problems
- 💊 then give more Video RAM
- if not possible, you already gave maximum Video RAM
- change the graphical controller
- most probably, downgrade the graphic controller, without
S
(11) test 2-1: Test shared folders

you need to have USB that is considered a shared folder
- In linux to use shared folders
- you need to add your user to the group of users who can share folders
- 👀 If you want to play video games, you need to add your user to the group of users who can play videogames
- 👉🏻 In linux, permissions are always indirect
- to get a permission in linux,
- you need to get added to the group of ppl who already have the permission
need to ask
sudoto help you get addedsudo adduser shpl vboxsfvboxsf: group of users who can already use shared folders- if adding your user to
vboxsfdoes not work, - it is bc you failed to install
GA
(12) restart/reboot the system
sudo reboot
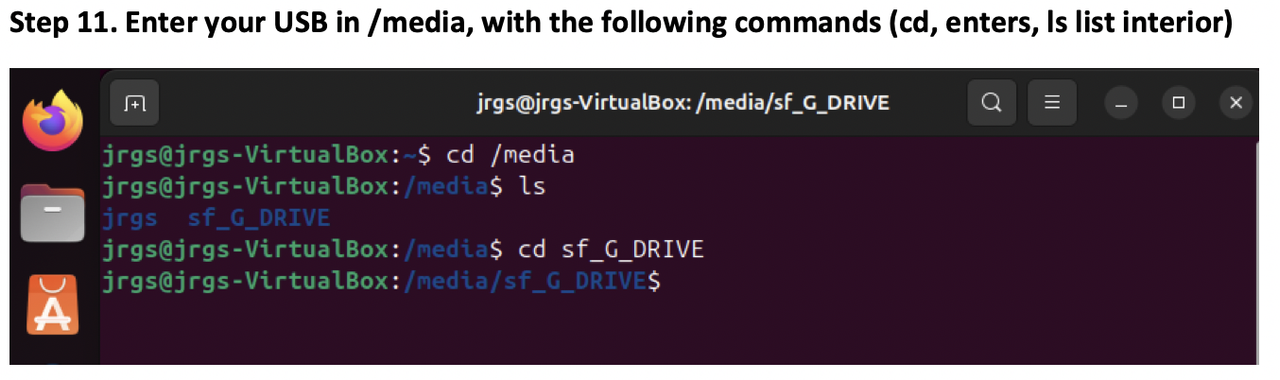
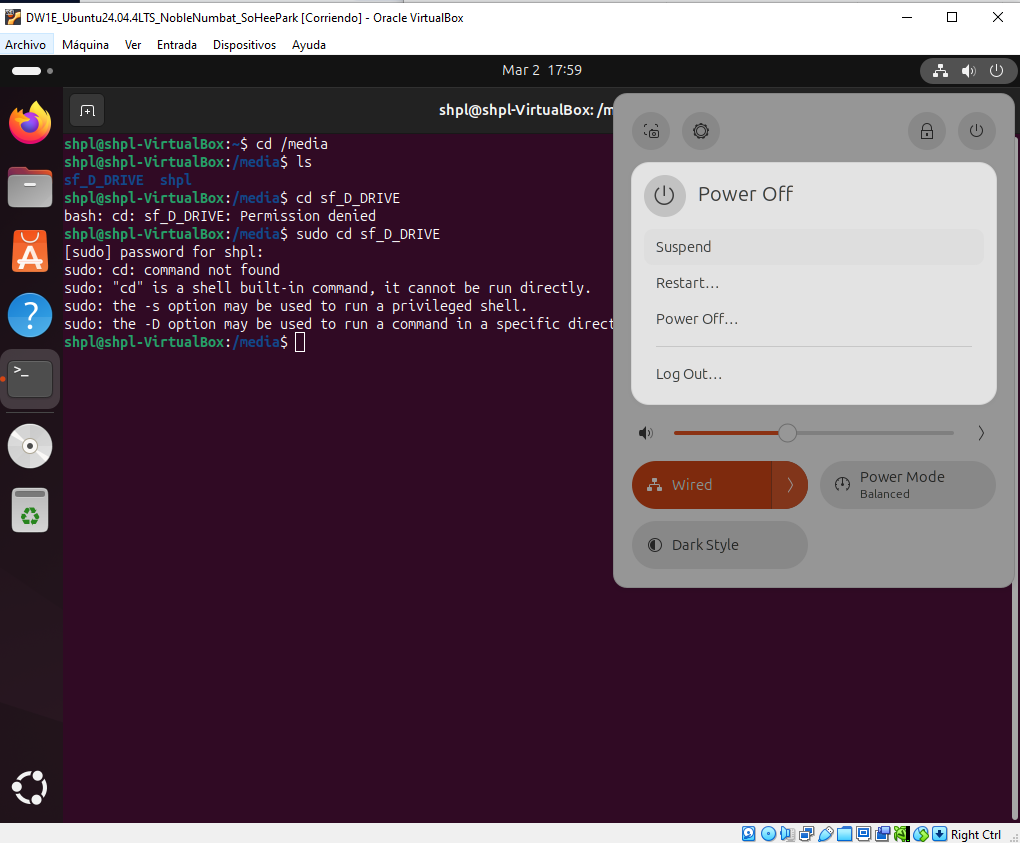
(13) test 2-2: check if shared folders work
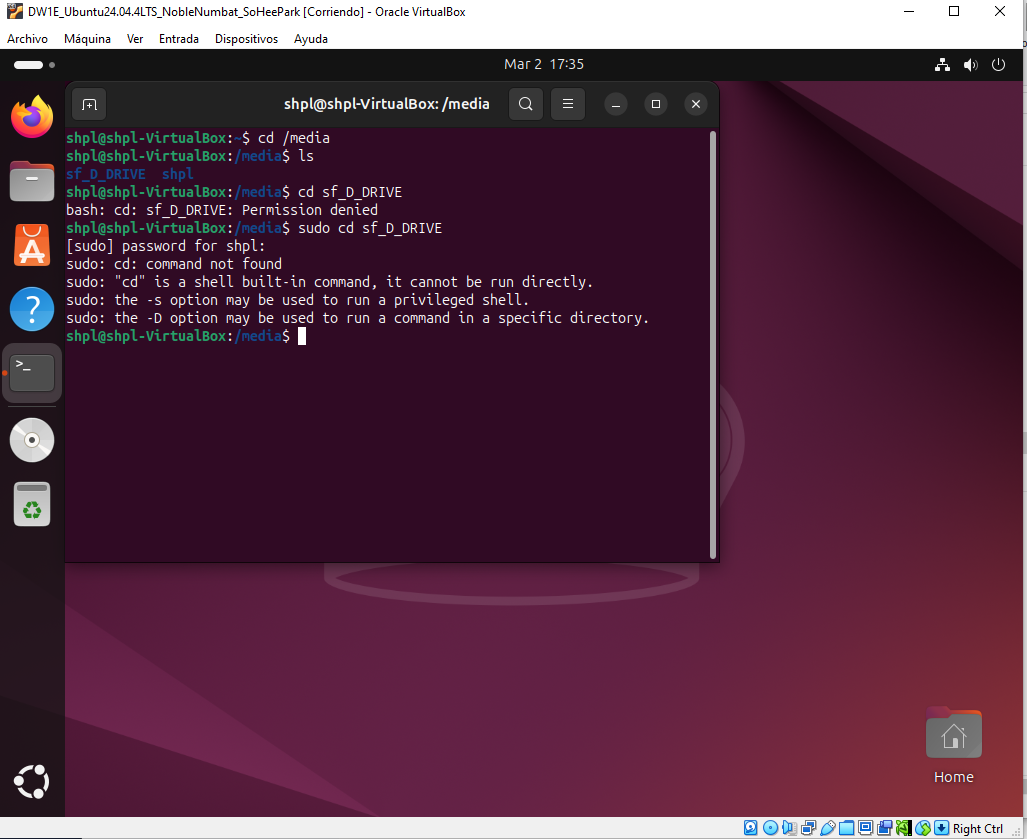
- if I was in 1️⃣ graphics mode, and graphics worked
- I can check it by clicking on the
files iconin the left bar shared folder starts with
sf- if you are in 2️⃣ commands mode,
- enter
cd /media and check if your shared folder is there
- then list the content of the directory
ls - check if your shared folder is there
- and enter it
cd sh_G_DRIVE - and list the content using
ls
(16) Once everything works, turn off the machine
- we want to take a shapshot
- switch the machine off
- for switching off, now that you have the OS,
- use the switch off button!

(15) Once everything works, take a shapshot
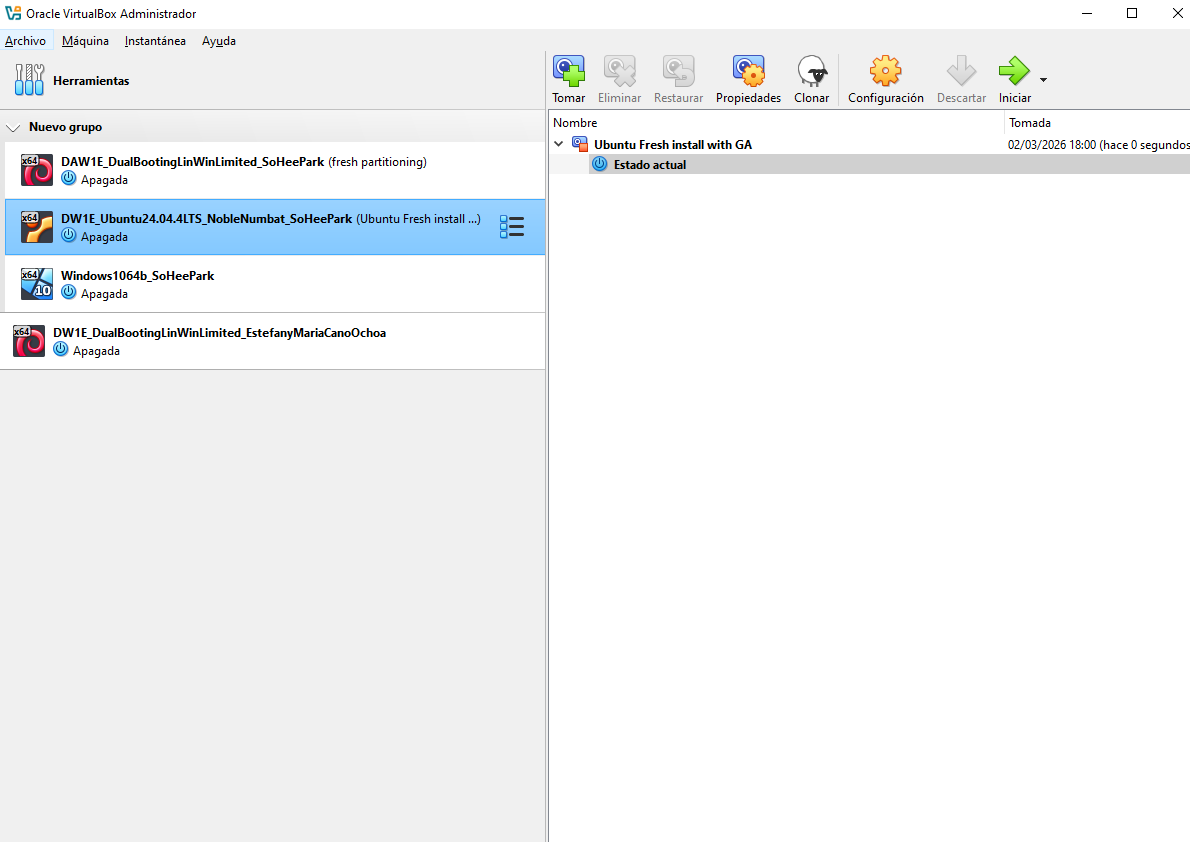
- make sure the machine is off
- change the name of shapshot
Ubuntu Fresh install with GA
//2ga 14
(16) Deploy the VM to another host
- deploy the VM
- do not use
.ova - sohee: copy the VM folder to a USB to
E:/ - sohee: create an access to that USB
- cesar: an create the access to the USB in
C:/ - cesar:
Macina > nueva >- name: same as sohee
- folder: and create
VBox folderinsideC:/ - hardware: corresponding to new host, cesar’s computer
- vdi: do not create, use the existing one
- and navigate to sohee’s USB,
E:/