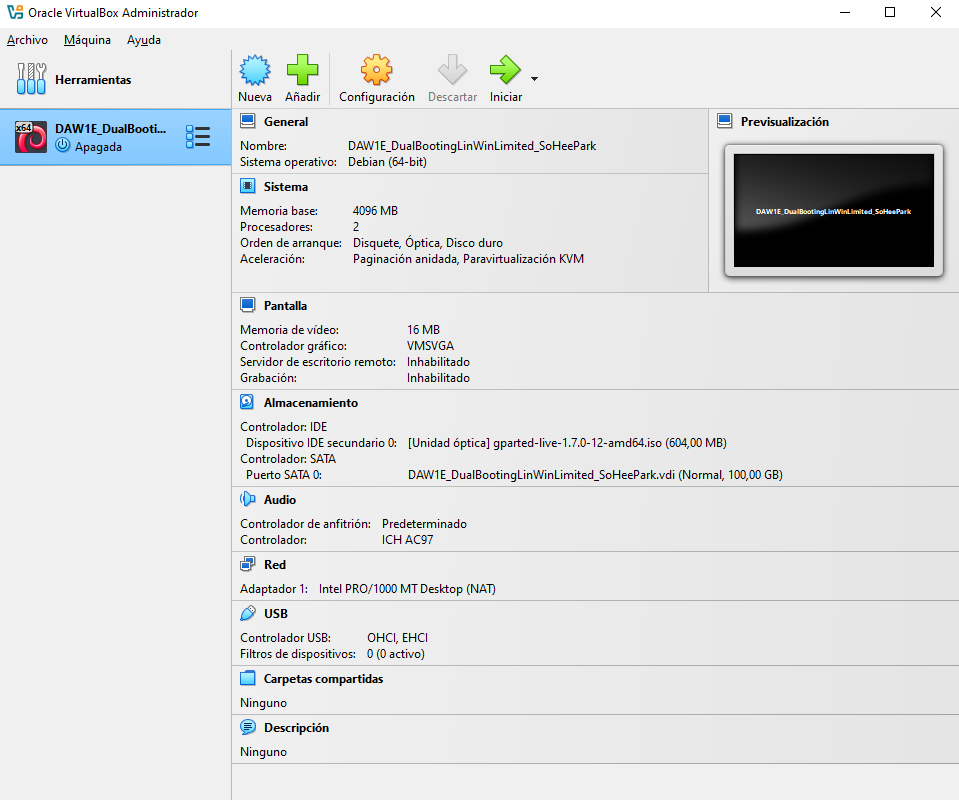
4.3 Creation of VM
✅ Create a new VM
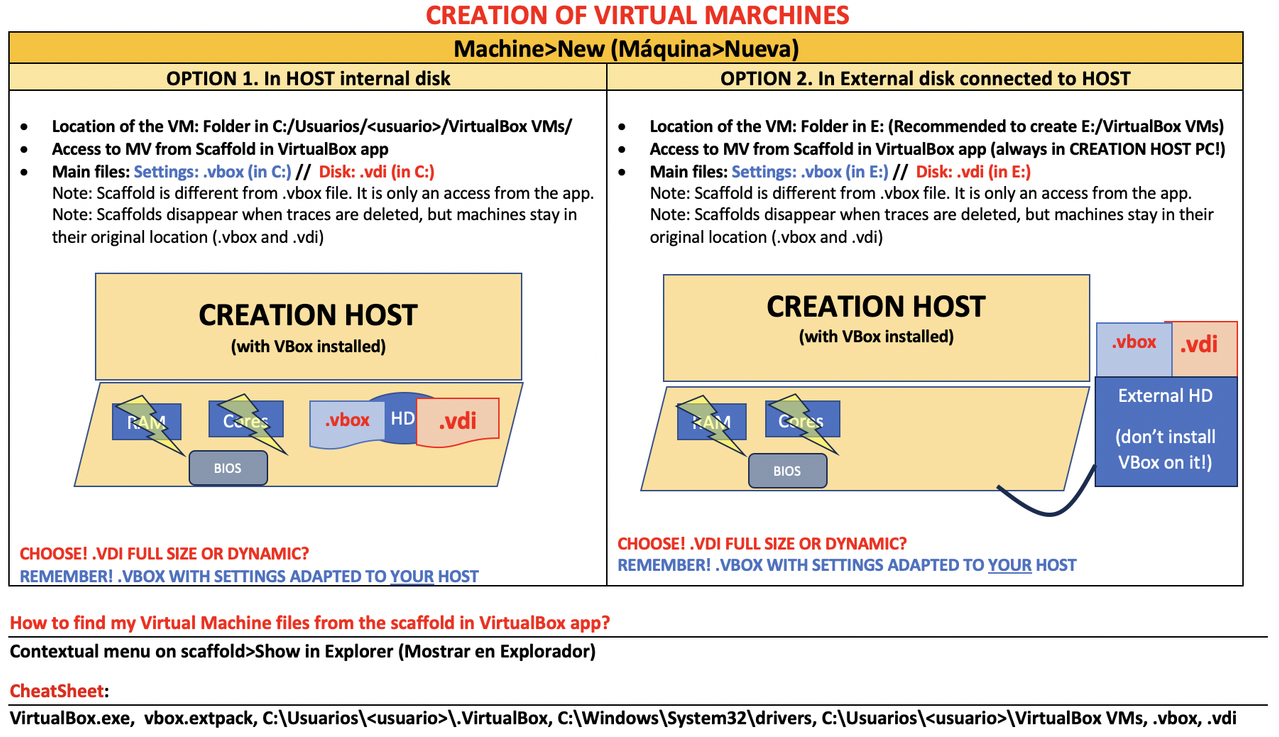
Maquina > New
- We have to decide if the machine will be created in
internalorexternaldisk the
HWis given by the host- VM
- changing BIOS -> checkbox named
EFI - file
.vdi
✅ HW for the VM is given by the host
- 1️⃣ RAM(RAM without SWAP)
- ❓ As a host, how much of my RAM should I give to the VM?
- 👉🏻 half
- the RAM of the VM must be
maximum of the half of the real machine - if you give more than half, the real RAM will suffer
VM RAM =
max 1/2 of the RM RAM- ⭐️ Sometimes VM can run better if you give less RAM
- as I give more RAM to the real host machine
and the real machine can push the booting process
- 2️⃣ Cores
- ❓ As a host, if I have several cores in my CPU, how many cores should I give to the VM?
- 👉🏻 half
- VM cores = max
1/2 of the RM cores - sometimes VM need increased/decreased number of cores
so it depends
- 3️⃣ BIOS
- ❓ If RM has legacy BIOS, can VM have UEFI BIOS?
- YES! VM can be anything
👉🏻 Regardless of BIOS in RM, VM can have any BIOS, legacy or UEFI
- There is a UEFI simulator
- This simulation is activated with a
checkbox EFI so click on the
EFIcheckbox- 4️⃣ Harddisk
- 👉🏻
minimum necessary VM HD = miminum
- The portion of the HD that VM uses
- is isolated from the rest
- bc that part of the portion is not a partition
- but it will be lots of files, in a separate part
- and the files will be encrypted
- 👍🏻 so all the other files in the host will be protected
- so files of VM and the files that are not are separated
- 👍🏻 protect host from infections from virus
that file is called
.vdi- ✔️ .
vdi - that file that you create for the VM are called
.vdi - portion of the HD for the VM
- will be represented with a red cube 🟥
so you can make a worm in the VM, and the other
- ✔️ Scaffold
- the
.vboxis also known as scaffold, settings settings for the VM(like the RAM capacity, EFI, Cores)
- ✔️ .vbox
1
2
3
scaffolding for VM
the settings for the VM
this depends on each computer
- settings of the hardware that I dedicate to the guest has the extension
.vbox - settings of the hardware that I dedicate to VM are stored in settings file with extension
.vbox - the settings of the host that I dedicate to the VM are stored in the file with a extension
.vbox with a blue cube 🟦
- each host computer has its own scaffold
- each host has different access to the VM
the accesses to the machine
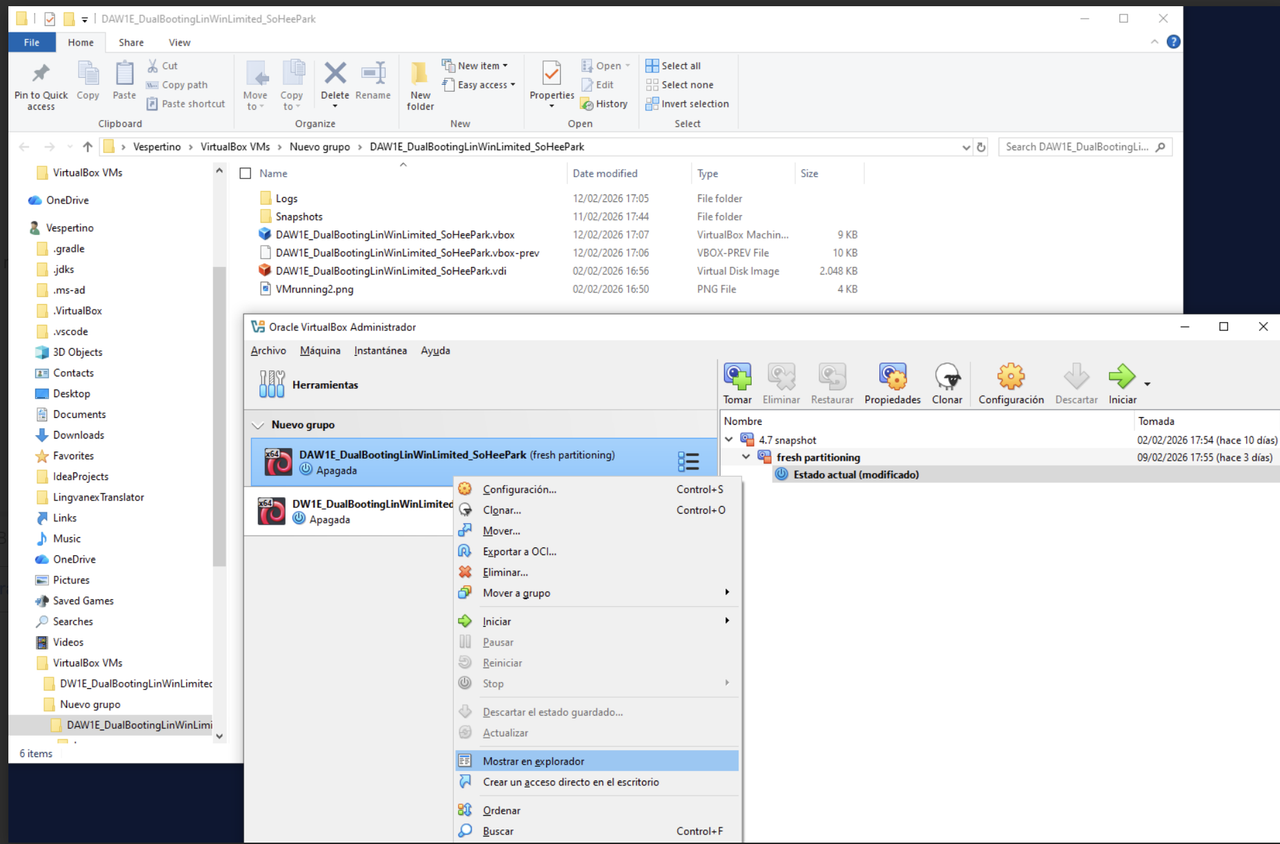
- In Virtual Box
- in the
leftside, you have the scaffolds, accesses to the machine - If you
right clickon one scaffold - and click on option
show in explorer you will reach the
.vboxand the.vdifile- the machine only with
.vdican be repaired - you just create a new scaffold
- ⚠️ but a machine only with
.vboxis lost forver bc
.vboxonly contains the settings- 💡 The application, the extension pack and the **link between them **should be installed in every host machines
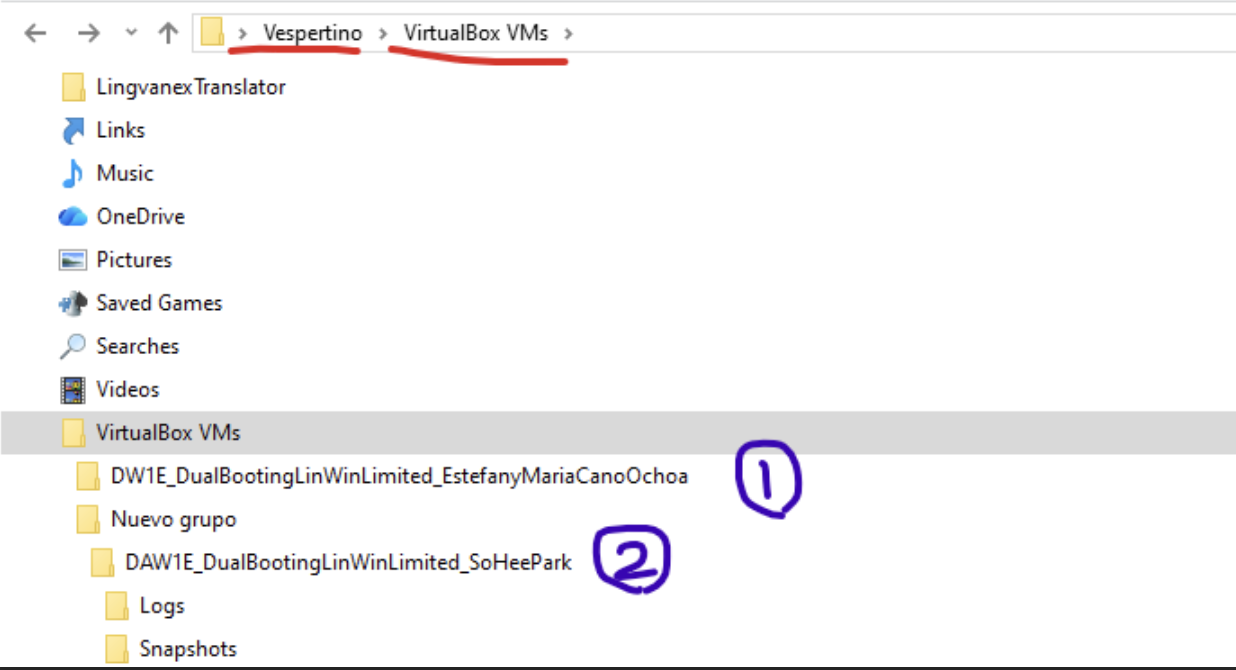
✅ Where are you going to create the VM?
1️⃣ Internal disk
- if you created a VM in the internal disk of your computer,
.vdi.vboxare both inside the internal disk of your computer- ❓ Where? both are inside
C\Users\<user>\VirtualBox VMsfolder - inside this folder, you will have one sub folder for each machine
- if you move your folder from there
- the access to VM will be unaccessible
so just do not move them, keep it there
- the
.vboxkeeps the file of that VM computer
2️⃣ External disk
👍🏻 portable
- if you created a VM in the external disk of your computer,
the
.vdi.vboxare in the external disk- as the external disks do not have the strcuture
- we should create manually
VirtualBox VMsfolder hanging from the root inside the folder, there will one subfolder per VM machine
- the
.vboxfile, although it is inside the external fisk - it will contain the settings for the host computer
- so if you change the host computer
- the
.vboxfile will not be valid, depending on the host - so if you change the host computer, you need to adapt the
.vboxto the new host ofc, the
.vboxwill work if several host computer settings are the same or compatible- If you create a VM on the external disk
- you can bring the external disk home
- but then you should install/guarantee the following
- 💡 the
application,the extension packand theperfect the linkhas to be done in all computers
- thunder means half
📌 Cheatsheet
✔️ C:\Windows\System32\drivers
- traces, only delete if necessary
- delete
VBox*.sys - then reinstall VirtualBox
✔️ C:\Usuarios\<usuario>\.VirtualBox
- traces, only delete if necessary
- then reinstall VirtualBox
✔️ C:\Usuarios\<usuario>\VirtualBox VMs
- my VM, my
.vboxand.vdifiles
✔️ VirtualBox.exe
- installation program for Virtual Box
- when you download, it will be in the downloads the folder
- do not double click
- run as admin
✔️ vbox-extpack
- extension pack
- when you download, it will be in the downloads the folder
- do not double click
- find it in the
C:\File > tools > extensionand link it
✔️ <filename>.iso
- the installer of the application or OS
- that you want to have on your VM
- do not double click
- when you have a
.iso, you have two options - (1) be in front of your computer when you install the OS
- (2) unattended install
- if you do not want unattended install,
- some computers have a tick named
omit unattended - some computers have a tick named
proceed with unattended - if I do not want unattended: click on
omit - if I do not want unattended: do not click on
proceed - ⚠️ a mistake here has no return
✅ Size of .vdi
can be given in two ways
- 1️⃣ Full Size
- give those bytes at once
- creation of VM will be slower
- but then after creation
- fast access
🛠️ We know how much capacity we need
- 2️⃣ Dynamic Size
- get the minimum bytes
- then increase later
- creation of VM will be faster
- but then after creation
- access will be slower
- 🛠️ If we do not know if we are going to use the complete capacity
- we do not know the capacity we need
✅ VM Name
- the name of the VM should always contain
all the information about the VM
- name should contain:
- creator
- what group does this machine belong to
- the content and characteristics(version, edition…) of the machine
- first letter of each word in capital
- no space in names
no accents, no strange characters
- 👀
DW1E_DualBootingLinWinLimited_SoHeePark
📢 Exercise 1
1
2
3
4
5
6
- SoHee is a customer with a old computer, with a legacy
- She has 100GB space in her HD
- and she wants to try both linux + windows
- a lin-win, strong in windows, and the least in linux
- and she does not know how much VM she will use, maybe 100GB
- we want internal disk
1️⃣ First Window: Name and OS
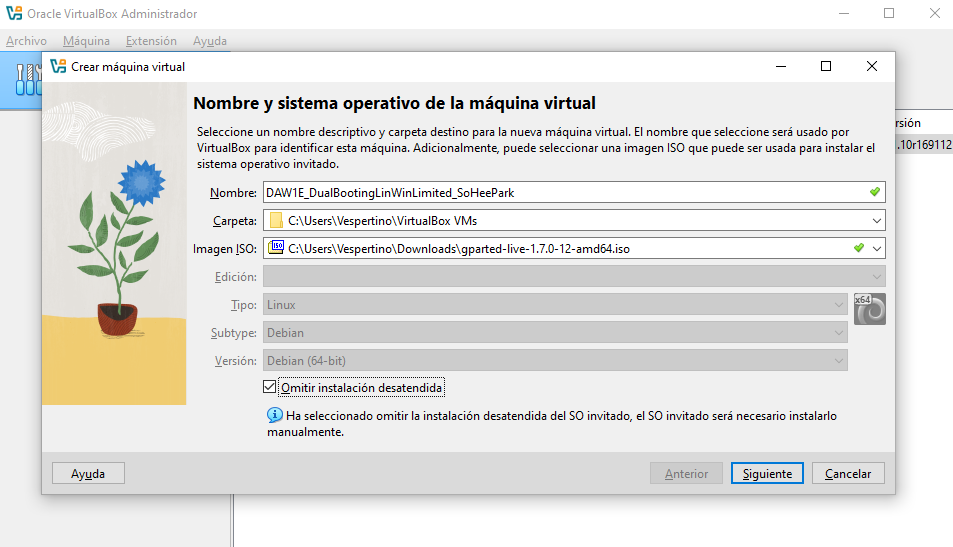
✔️ Name
💡 Important rule: the name of the VM must include all the information of the OS
the name should be
DW1E_DualBootingLinWinLimited_SoHeePark
✔️ Folder selection
- the folder selection is where we decide if we want internal or external
- for internal, it should be
C:\Users\Vespertino\VirtualBox VMs - for internal, just do not touch it
for external, click on the drop down and navigate to your external disk, and select the external disk
D:\VirtualBox VMs- and when you select smth, and undo it, then redo it
- better just start anew
- this happens bc virtual box is programmed in linux
- so it does not have been thouroughly tested
- no company behind to certify everything
✔️ iso
- .iso image file is the file you want to use for building your new system
- choose
GPartEd.iso - first .iso should be GPartEd iso
- then install Windows with windows.iso
- then linux.iso…
✔️ Edition, type, subtype
- edition, type, subtype should be completed by default, do not change
- if not completed by default, you have to complete it manually
- and do not make errors, typos
- 👀 You want
windows 10 32 bits iso, type needs to be windows - 👀 subtype needs to be 10
- 👀 version needs to be 32
with error in
edition,type,subtype, your VM will never work- we do not want unattened install
- omit it
2️⃣ Second Window: Hardware
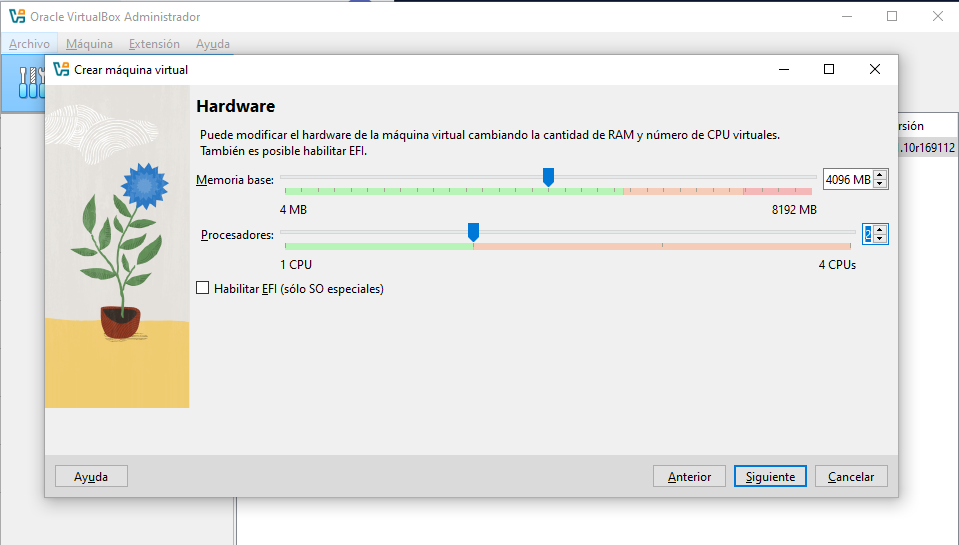
- RAM: half
- Core: half
- EFI is going to change depending on the moment
- now we have
GPartEd - so do not click EFI
3️⃣ Third Window: Disk size
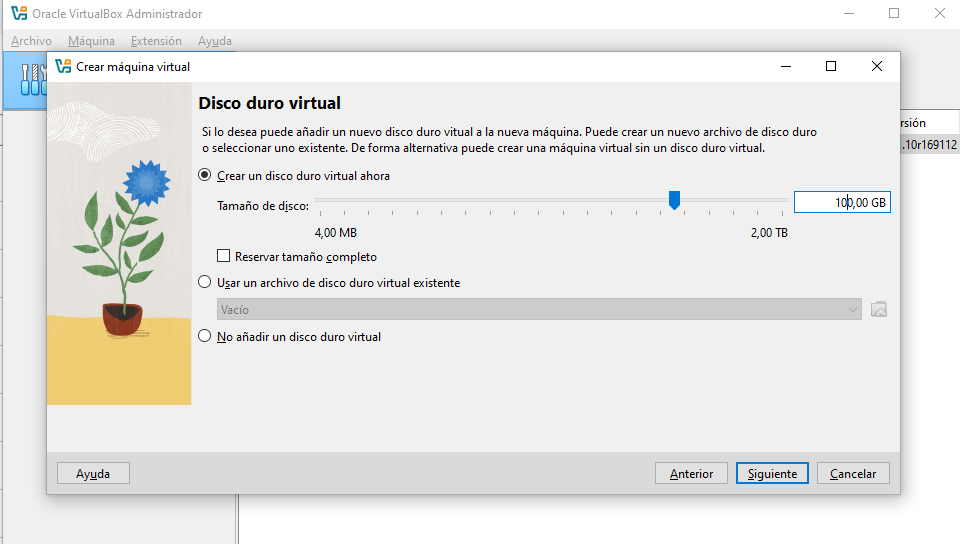
- disk size
- choose the size of the
vdi - choose 100G
- If it does not let me choose full size, it is bc
dynamic sizeis chosen by defualt - choosing
dynamic sizeis a good decision, as Soso does not know how much she wants to use - do not choose full size