4.15 GPartEd
- ➡️ is what I should choose in each step
✅ Menu of GPartEd
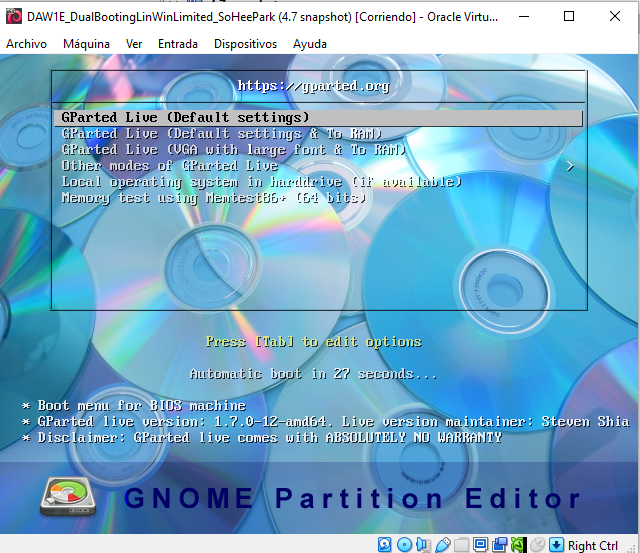
- just let it go, no need to choose, it will automatically choose the first option
- ➡️ first option is LIVE
- ⭐️ Live: use smth without installing
GPartEd Live: use GPartEd without installing
- ❓ Why do we use GPartEd Live?
- to create partitions for the first time,
- without installing it
✅ Keymap

- keymap: keyboard distribution
- 👀 keyboard with ñ is a spanish keyboard
- ➡️
Don't touch keymap - means application is using the standard keyboard that it finds
💡 How to screenshot in VM
- the screenshot shortcut do not work in VM
- use
recortes tool
✅ Language

- language of the application
- ➡️
33, means US English
✅ Mode
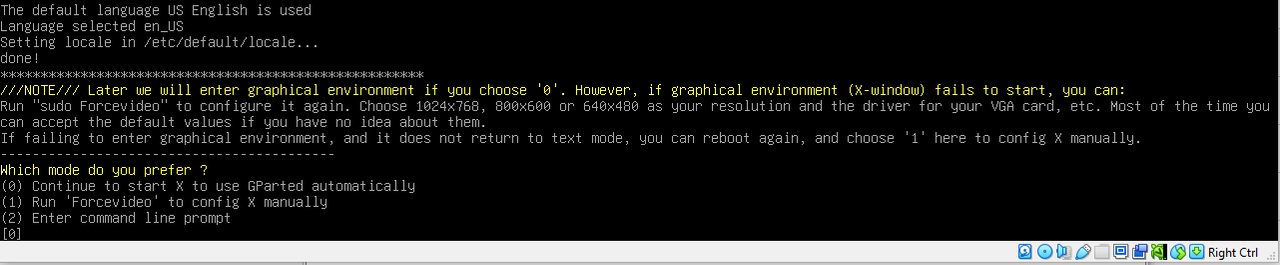
- mode of the application
✔️ There are two modes
- 1️⃣ command mode
2️⃣ graphic mode
- 💡 Rule: for administration, use
command mode administration: creating user
- 💡 Rule: for design, use
graphic mode - as we are designing partitions, use
graphic mode - most linux applications have
graphic modeby default
💡 Three enter access mode
- 👉🏻 Until here we pressed the enter key three times
- many linux profesisonal applications have a three enter access mode
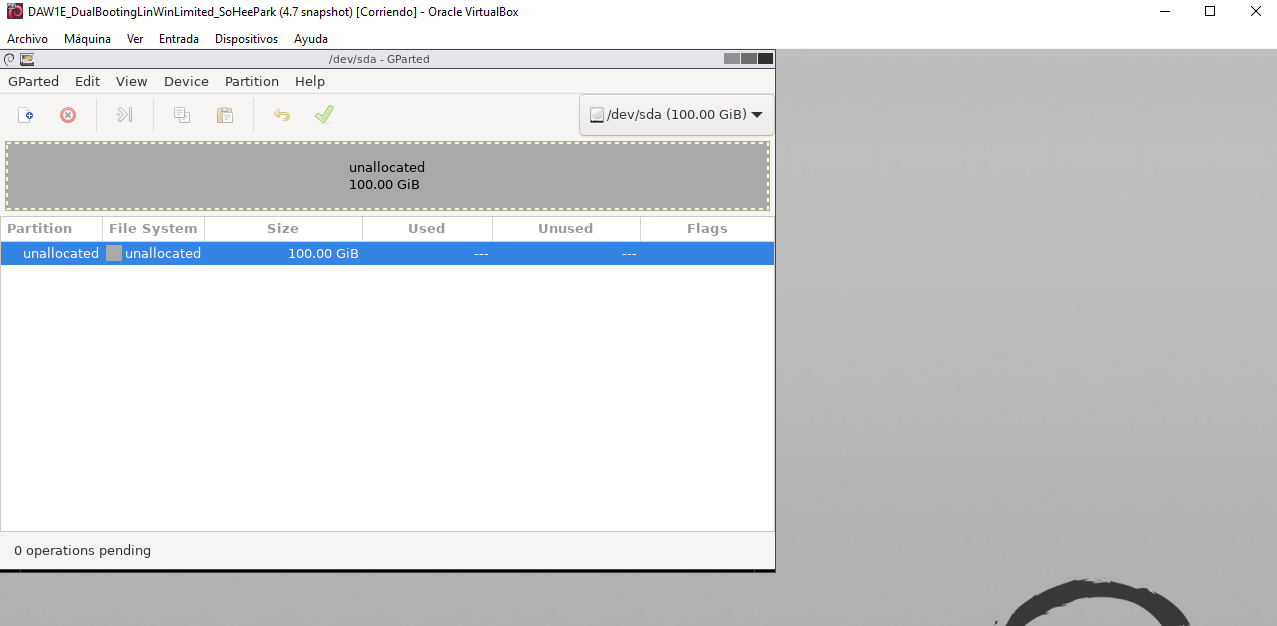
✅ GPartEd screen
after the three enters, the standard
GPartEdscreen will show upcheck the top right corner
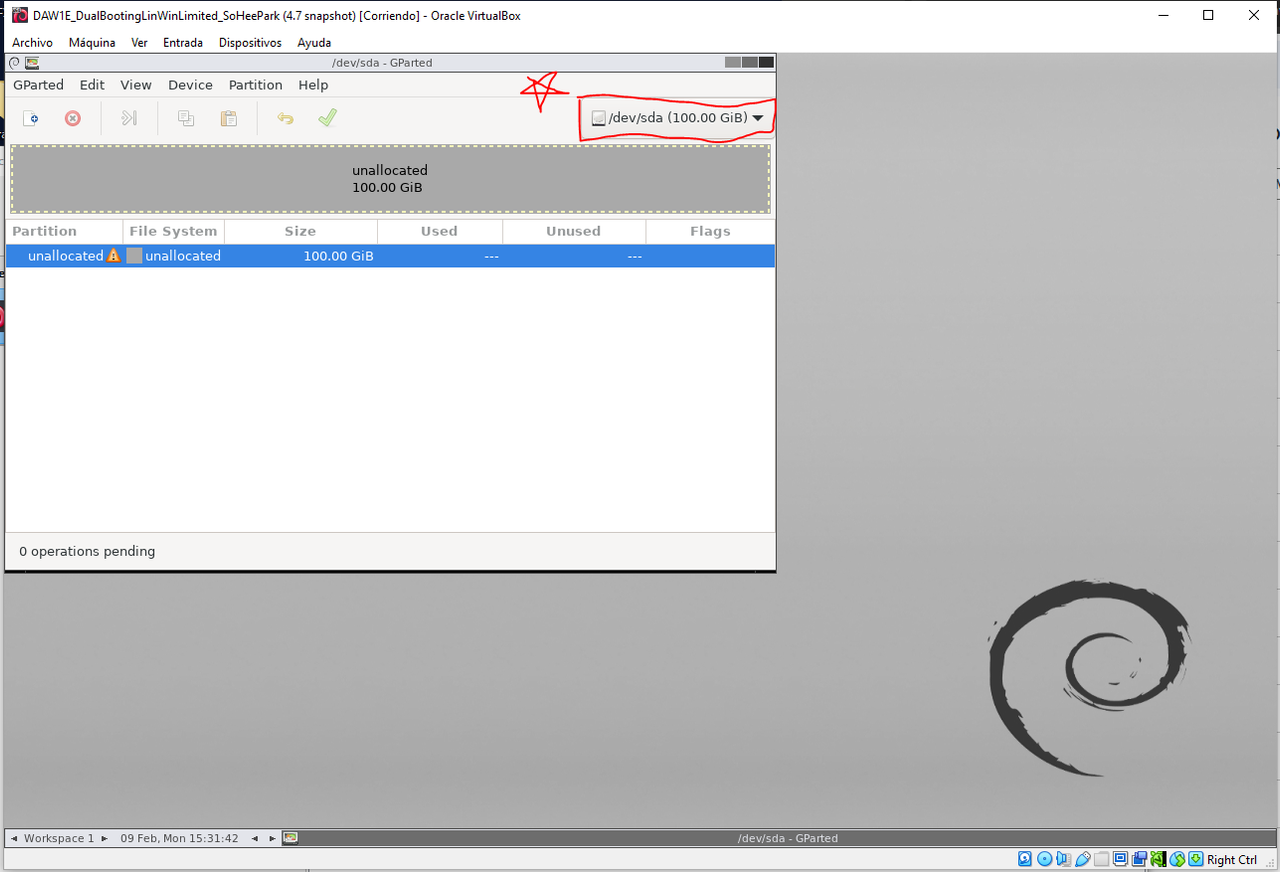
- 1️⃣ check that the size of the disk is correct!
- it should be
100GB - 2️⃣ check the direction of your disk
- make sure you are partitioning the
vdi - your
vdiwould be in direction/dev/sda - this is your internal disk
- ⚠️ if it is
/dev/sdbor/dev/sdc: then you are partitioning external disk

- 3️⃣ check the exclamation mark ⚠️
- exclamation mark: means you have to create the index
- in partitions, you create the index first, then the partitions
✅ Three embedded windows
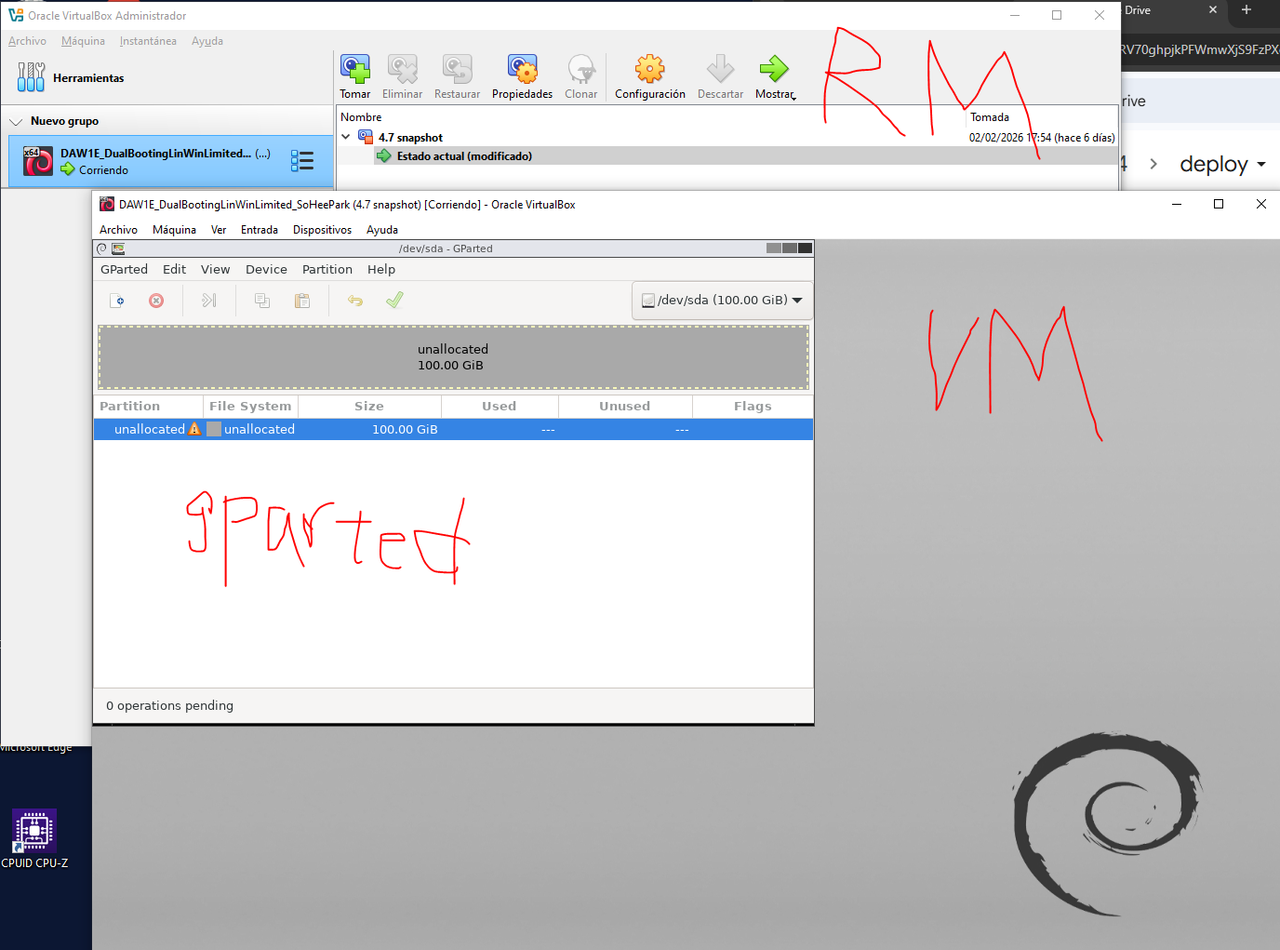
- When we run any appliaction in a VM,
we will see three windows
👉🏻 embedded windows
- internally: language of the application 👉🏻 English
- VM window: language of Virtual Box 👉🏻 Spanish
- Real machine window: language of the host OS
✅ Create the index
✔️ How to create the index
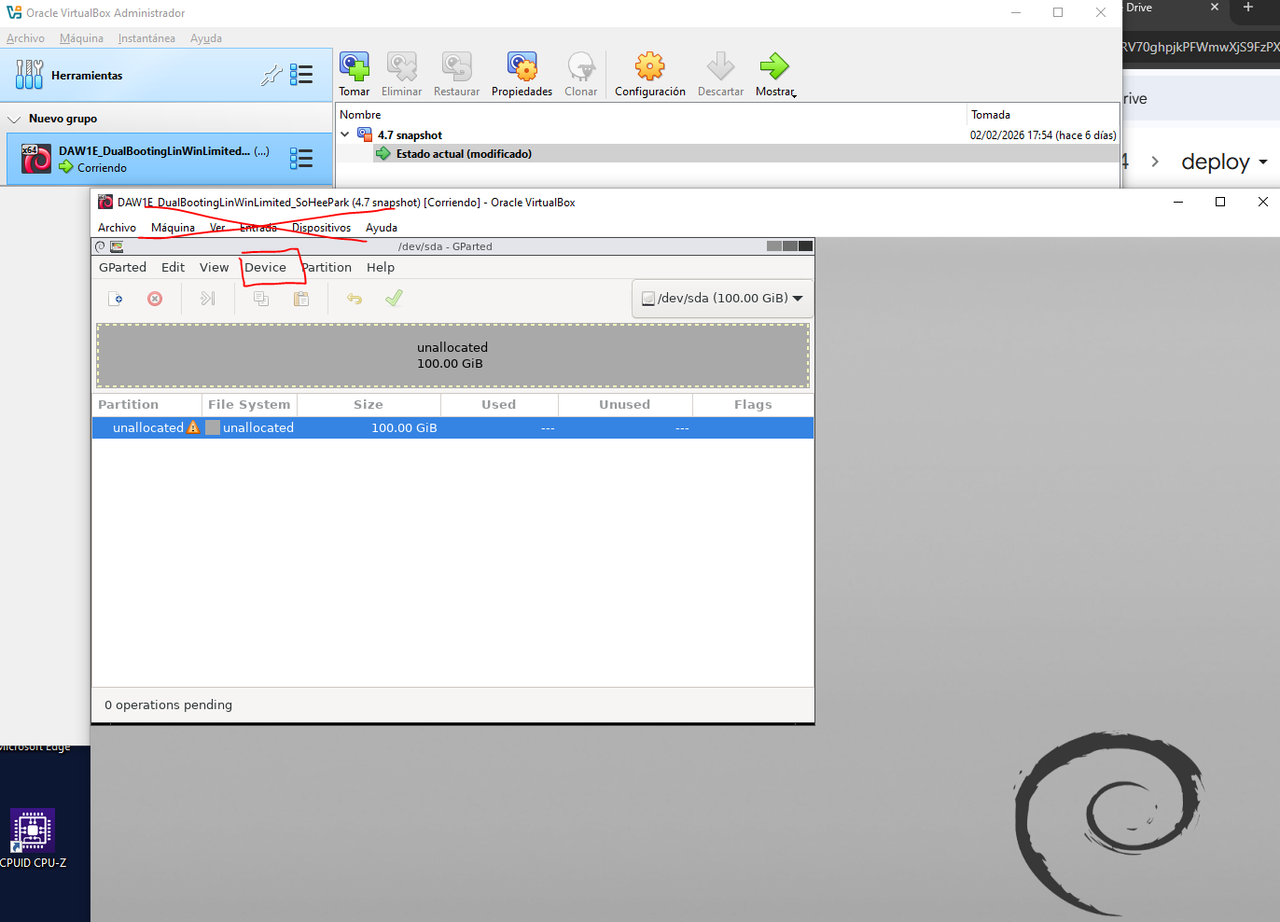
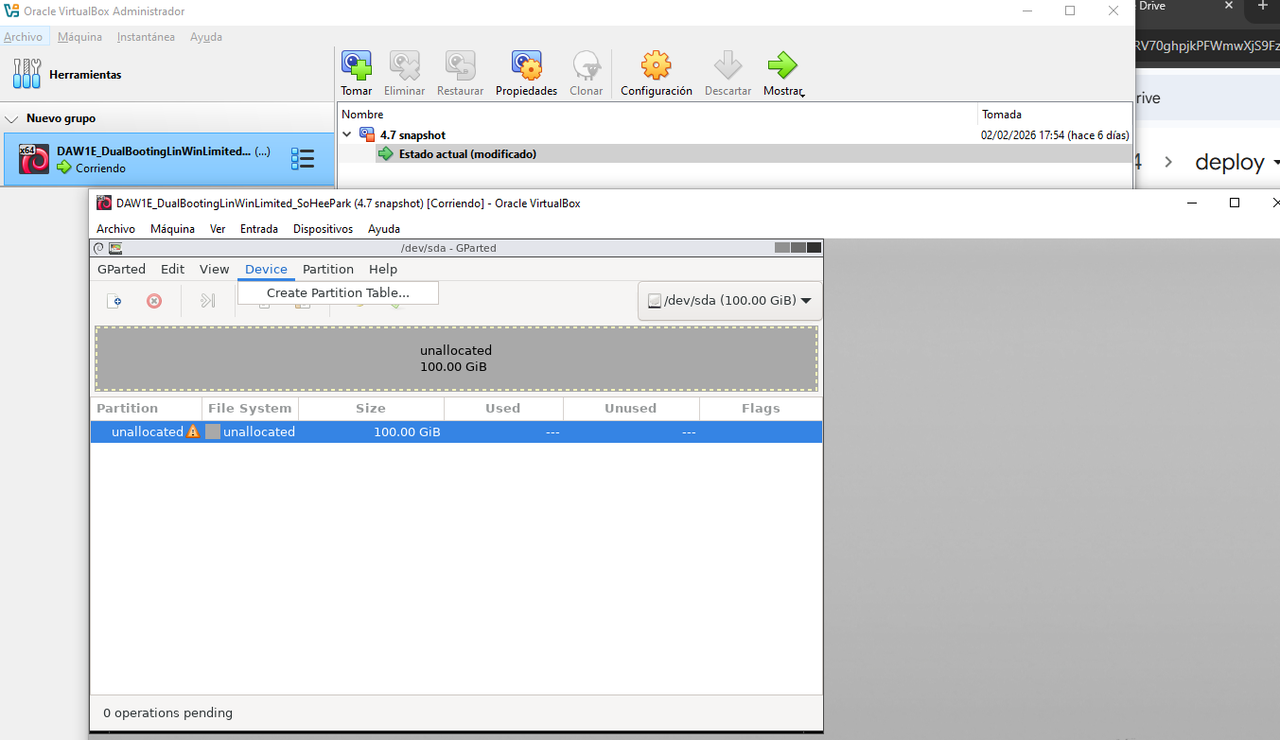
- menu
deviceof GPartEd device>Create Partition Table
✔️ Name of partitions
- MBR 🟰
msdos msdosis the first OS that worked with MBR- GPT
- ➡️
msdos
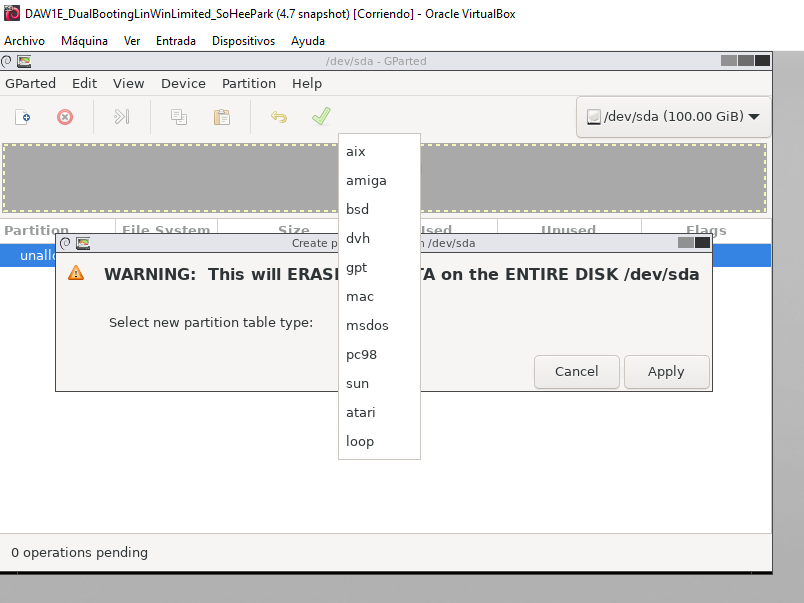
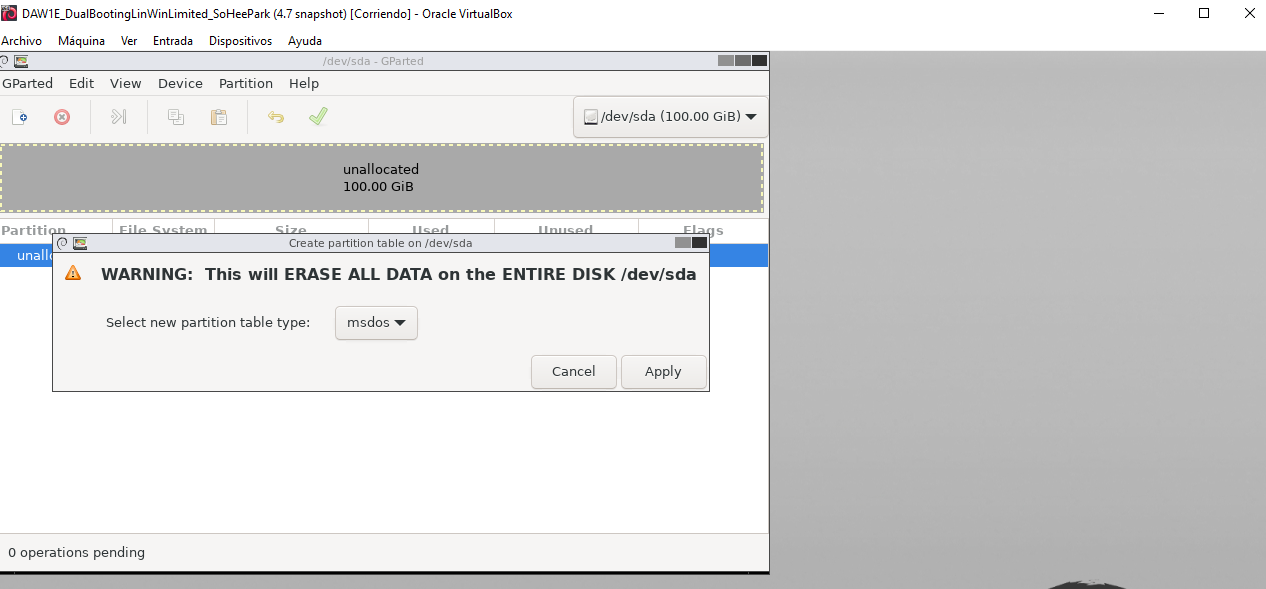
- after choosing your disk partition, the exclamation mark will be gone ⚠️
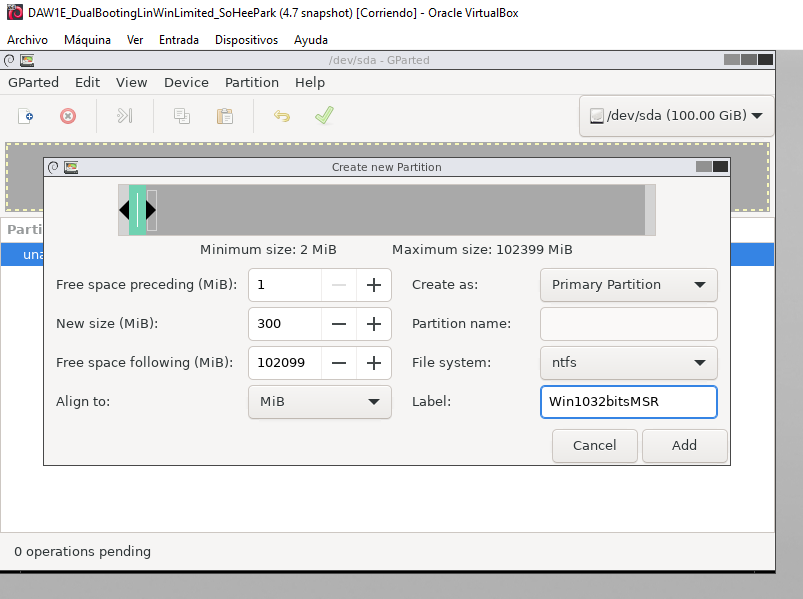
✅ Create partition
- when you want to create a partition
- always unallocated should be selected
if not, the new partition you are creating will be created over the existing partition
- after selecting on unallocated,
- click on plus
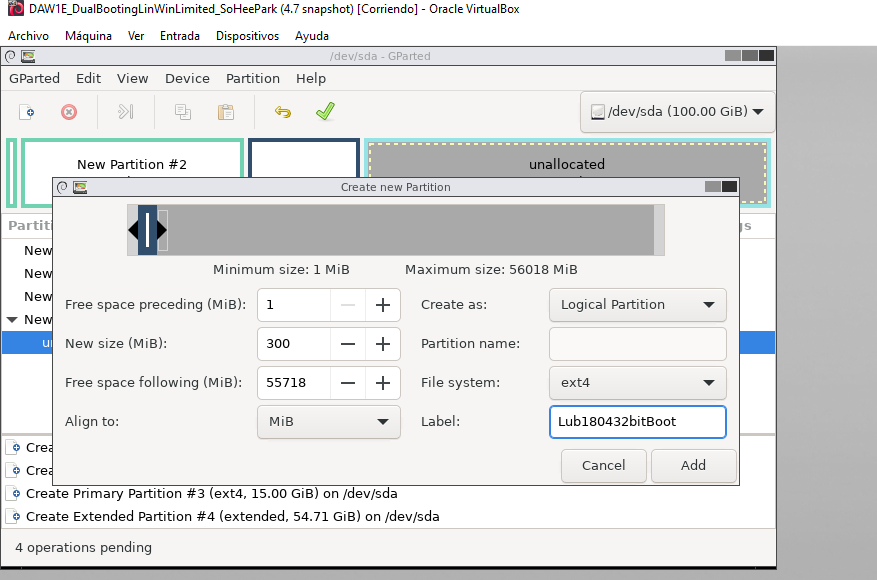
✔️ Free space preceding(MiB):
- how much space you want before the partition
- ➡️
0 0means no wasted space before the partition- ➡️ if
0is not possible,1
❓ Why is it a good idea to put 0 for free space preceding?
- because we do not want to waste space between the partitions
- you create holes
- and zombie cookies will try to go to that holes
- 👉🏻 to avoid holes, to avoid zombie cookies
the holes do not belong to any partition, the antivirus cannot check those holes
- ⭐️ cookie: text files for saving preferences
- ⭐️ zombie cookie: changes location, and hides inside the holes, escaping antivirus, easily infect
❓ Why is it impossible to add a O?
- sometimes it is not possible, because of two reasons
- 1️⃣ to create Unit 0: need to save the index in unit 0, need some megabytes
- 2️⃣ to change format between partitions: from windows(
NTFS) to linux(ext2,3,4)
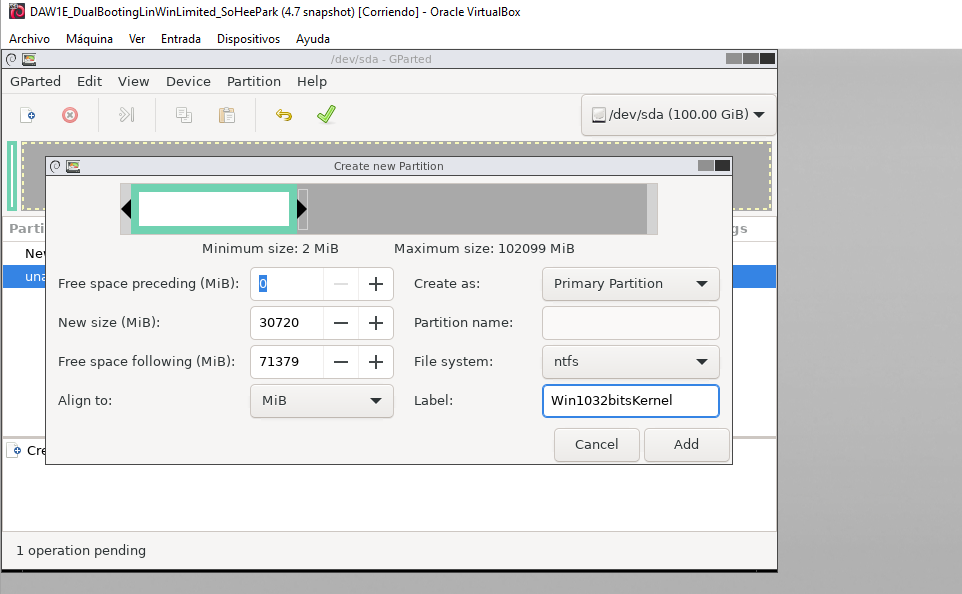
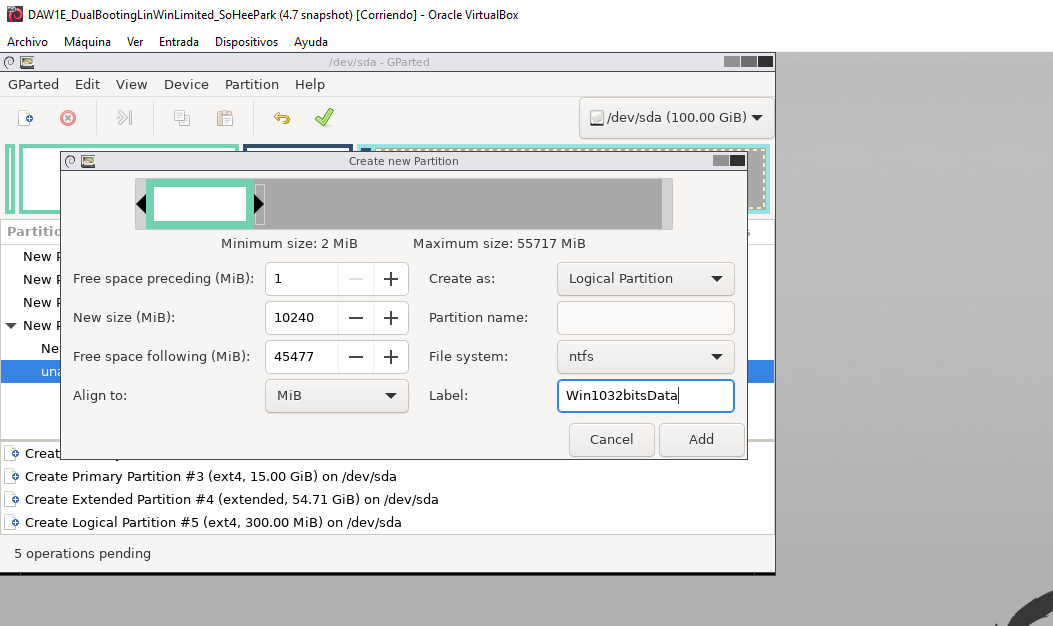
✔️ New size(MiB):
- size of the partitions in MegaBytes
- from GB to MB,
multiply by 1024
✔️ Free space following
- do not modify, automatically filled in
- space at the end of the disk
✔️ Align to
- leave as default
✔️ Create as
- type of partition
- primary, logical…
✔️ Partition name
- technical name of the partition
- it is chosen by default, not editable
/dev/sda1,2,3...- for the system, filled in automatically
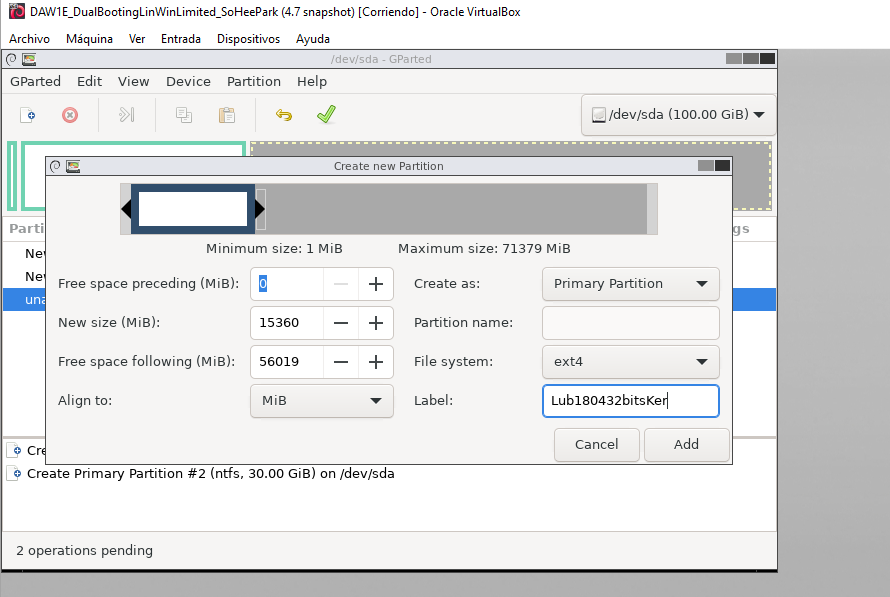
✔️ File system
- format of the partition
- 👀 NTFS, ext4…
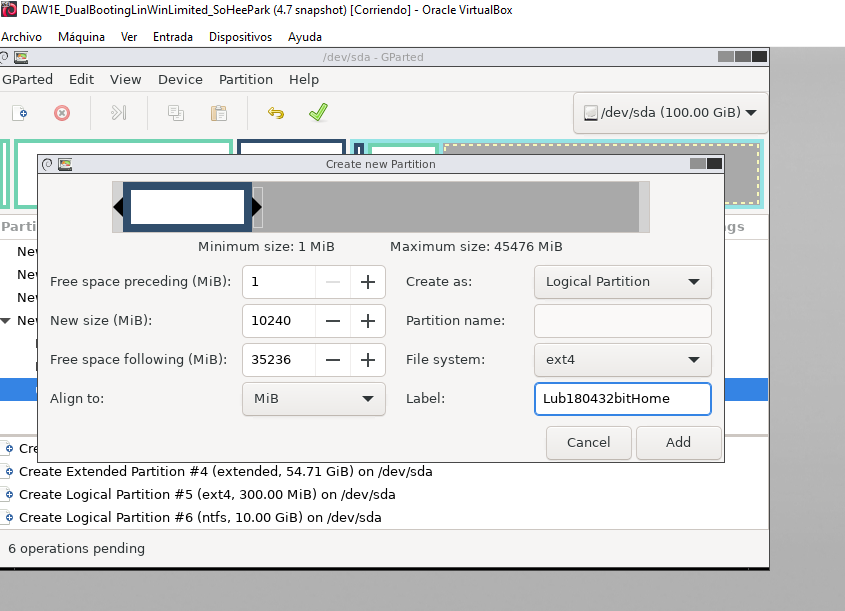
✔️ Label
- non technical name that the technician to give to the disk
- 👀 kernel, boot, data, tunnel…
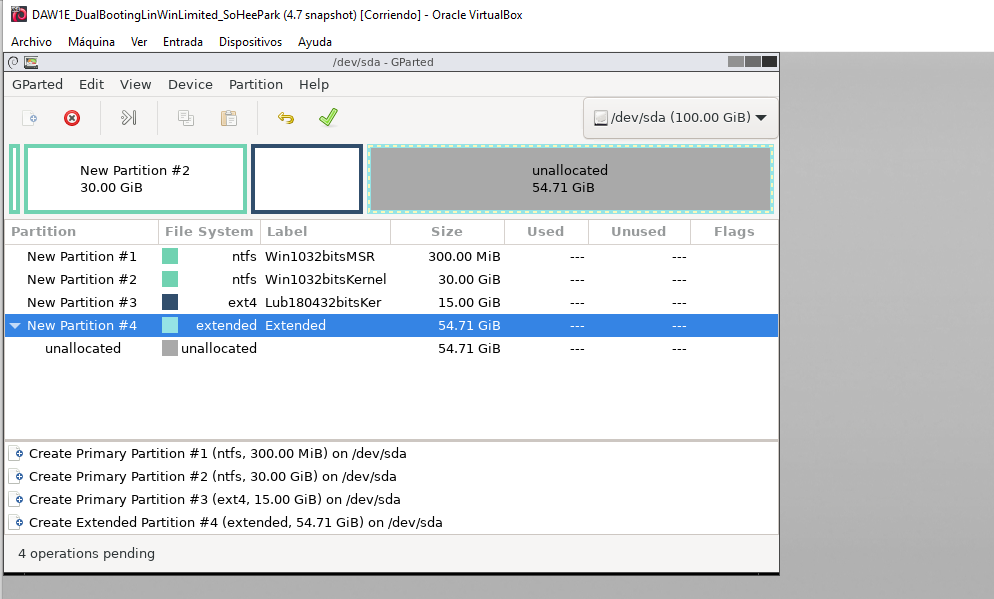
✅ Primary partitions
1️⃣ Win10/32bits/MSR
- for booting windows
2️⃣ Win10/32bits/kernel
- for windows kernel
3️⃣ Linux18.04/32bits/kernel
- for lubuntu kernel
✅ Extended
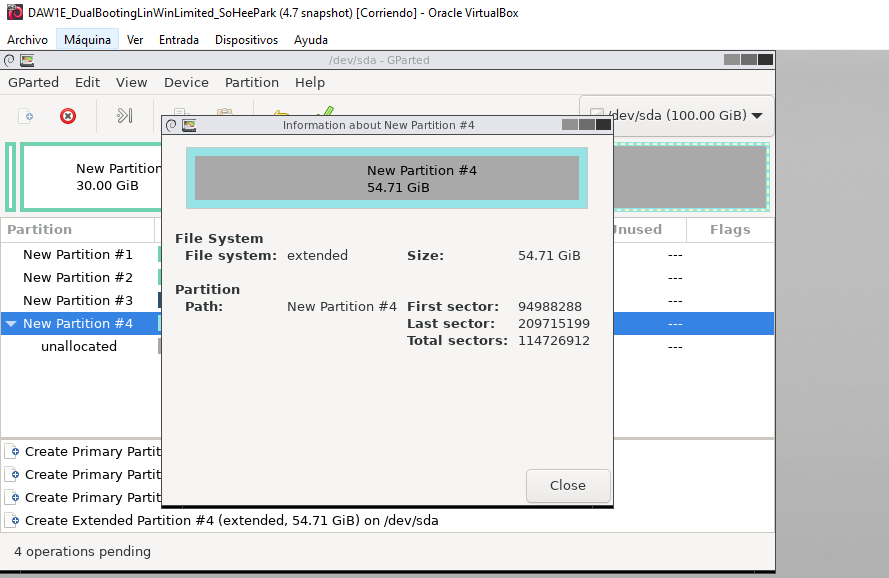
- Extended partitions should be created before the logical partitions
❓ What should be the size of the external partition?
100GB - 300MB - 30GB - 15GBjust select
Create asasexteded, then the remaingin size will be automatically calculated- ⚠️ space following the extended disk should be 0
- end of the disk should be 0
- so
Free spae followingshould be 0, this is not reachable at the end, outside3P+E Free Spaceshould be 0- 🤦🏻♀️ why create unreachable space?
1
2
3
4
5
6
7
8
9
10
11
12
13
14
15
16
17
❓ When we create the extended partition,
we accidently leave 200MB after/following the extended.
And we have legacy BIOS

- question A: Are they reachable with the legacy?
- No. Legacy can only reach 4 partitions

- question B: Are they reachable with the UEFI and the MBR disk?
- NO. They are more than 4

- question C: How can I reach the 200MB?
- 1️⃣ we change the MBR into GPT
- 2️⃣ need to extract the disk, connect it to the computer with the UEFI
- then we have UEFI and GPT
- now, we can finally reach the 200MB
- and reassign/put it inside the umbrella
- now, bring the disk back to the original computer
1
2
❓ What should be the file system of the external partition?
- extended
- Now, unallocated is inside the extended!
✅ Logicals
- Note: when you select inside the VM, do it slowly
✔️ Lubuntu18.04/32bits/boot
- for lubuntu to boot
✔️ Windows10/32bits/data
- version hopping
✔️ Lubuntu18.04/32bits/home
- for linux data
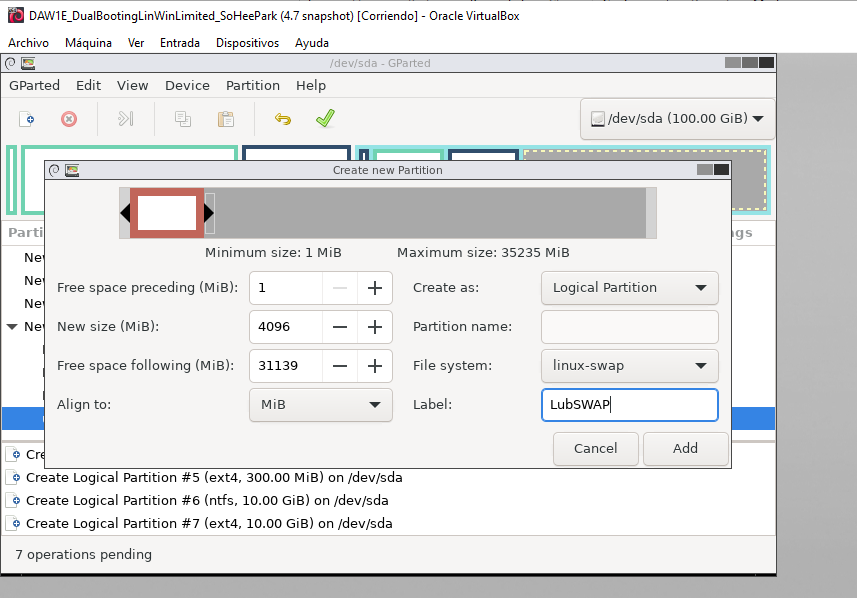
✔️ Lubuntu18.04/32bits/SWAP
- ❗️ attention:
file-systemislinux-swap
✔️ Tunneling
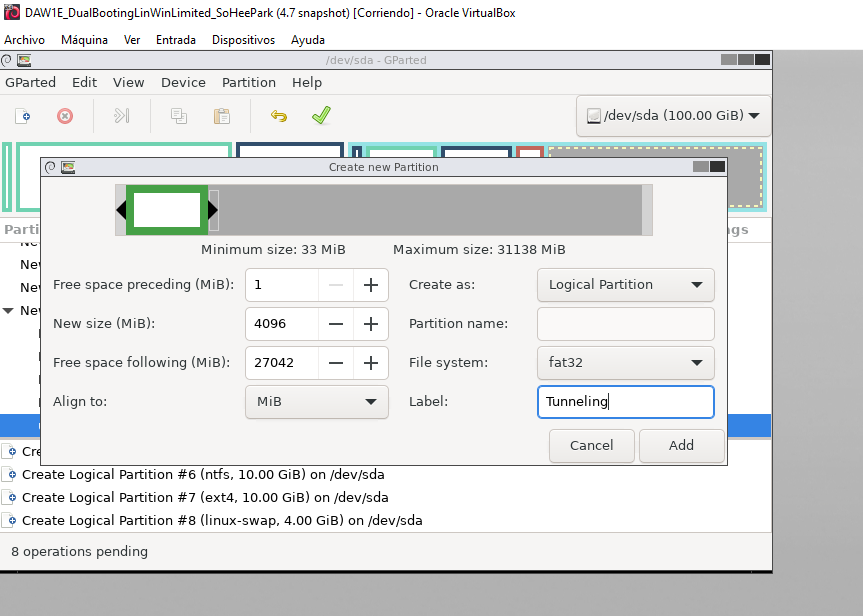
➡️ Final predesign
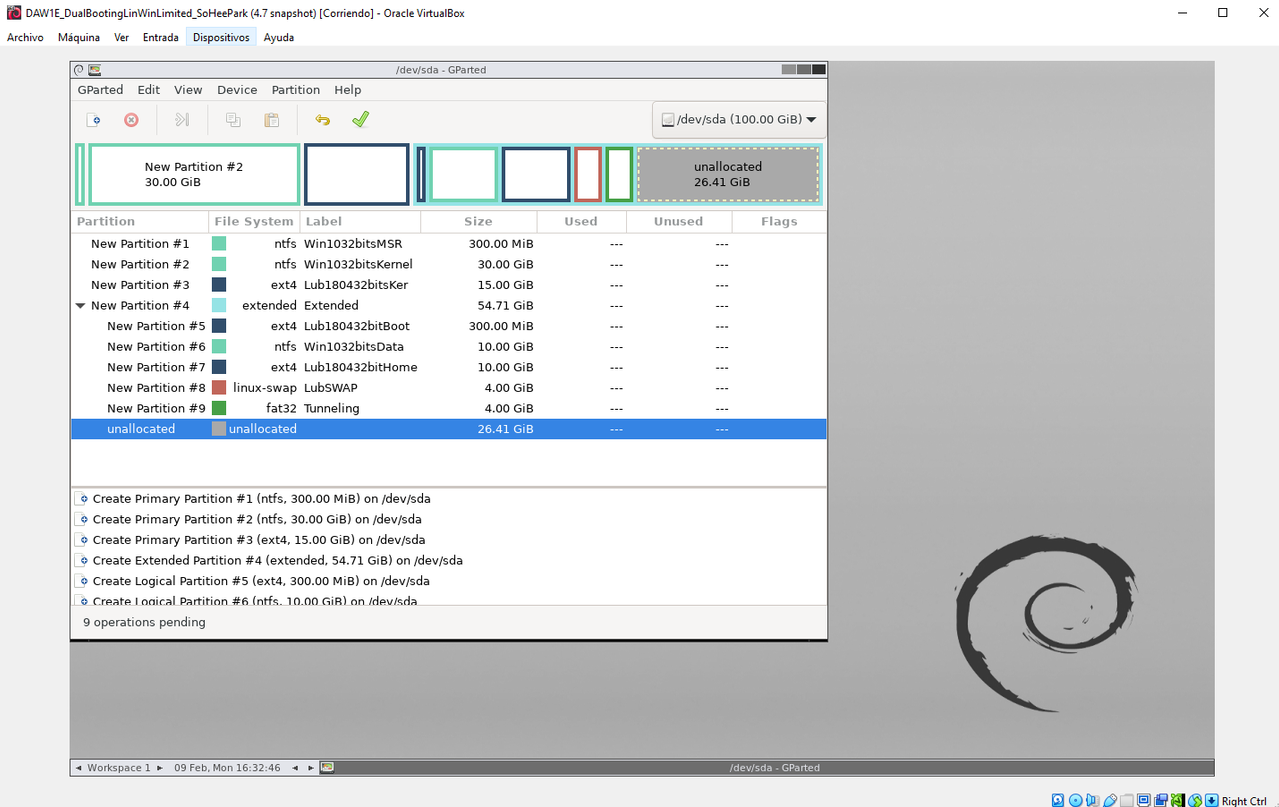
✅ Save the partitions
- click on the green tick
- unless clicking on the green tick, nothing is saved
you can modify before clicking on the green tick
- if you make a mistake,
- you can only change sizes, posistion of the partition, format of the partition
if you want to change other things, delete and create again
- if you made too many mistakes,
- better to delete and create again
✅ Bugs or spurious errors might appear
- error due to the real situation of the host at that moment
- not the technician, your fault
- at the moment of creating the partitions
- the host had other things to do
so the host intercepted the VM
- 💊 go to the first partition that has a bug
- bugs appear with the exclamation mark ⚠️
- and delete from there onwards
and start again
- If there was no errors
- the message
All operations successfully completedmust appear
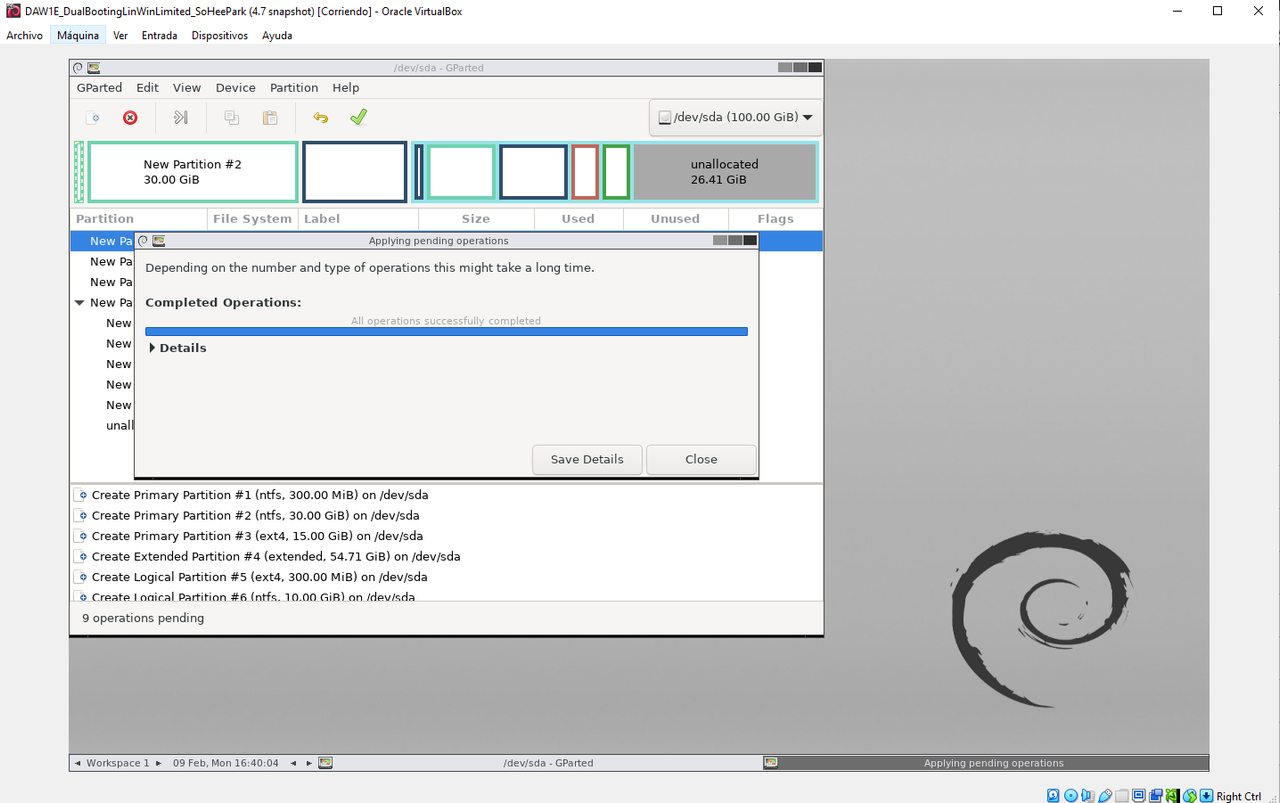
✅ Enter details
- Then, enter ▶️ details
- mandatory to enter one of the NTFS partitions
- (ideally the kernel)
✔️ There should be four steps
- 1️⃣ Book the space
create empty partition - 2️⃣ Clear the old system
clear old file system signatures in /dev/sda2 3️⃣ Prepare for the new system
set partition type on /dev/sda2if you missed one of the four steps, you can run it with a command
- 4️⃣ Create the file system
create new ntfs file system - mandatory to enter step 4
mkntfs -Q -v -F -L 'Win1032bitsKernel' '/dev/sda2/'mk: makentfs: format is ntfsWin1032bitsKernel: label/dev/sda2: technical name of the partition
✔️ enter the mk command
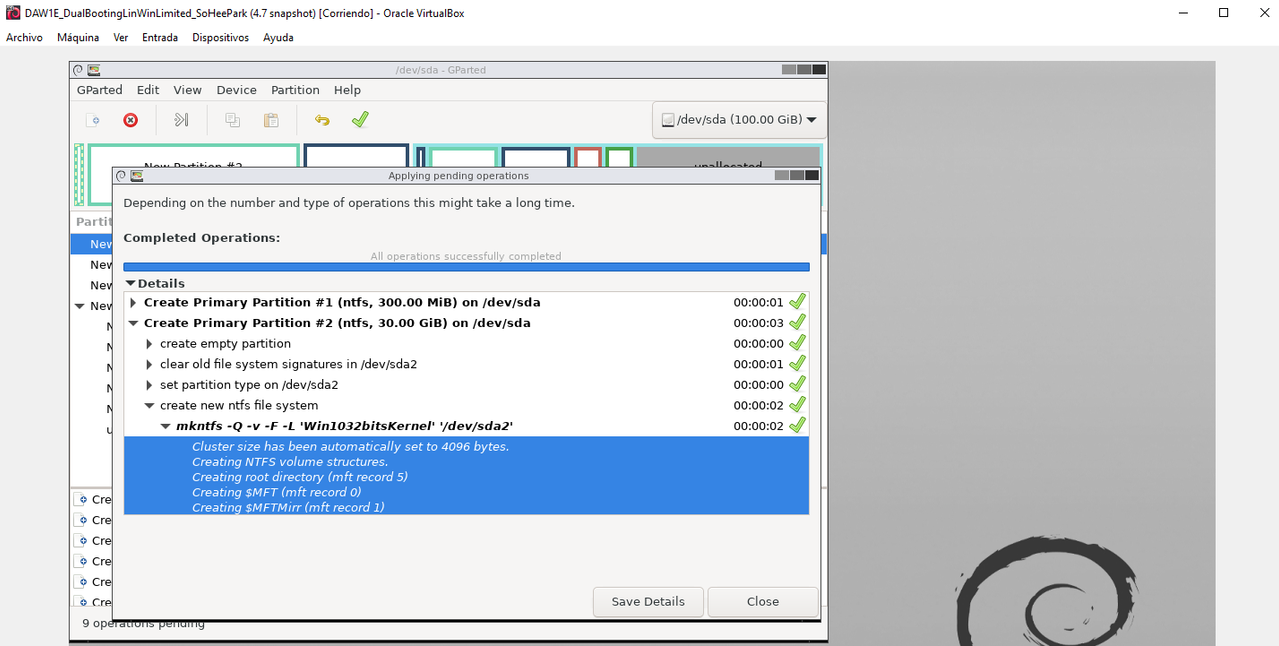
- you will see
- ➡️ cluster size
- if I have a cluster size of
4096 Bytes=4KB - all the files should be a multiple of
4KB - this is the cluster size of the windows partition
- and this would be the cluster size of all the disk, even in linux
cluster size is always balanced
- 💡 in linux name of cluster size is
block size
1
2
❓ What is the block size of this disk?
- 4KB
✅ When 0 operations pending
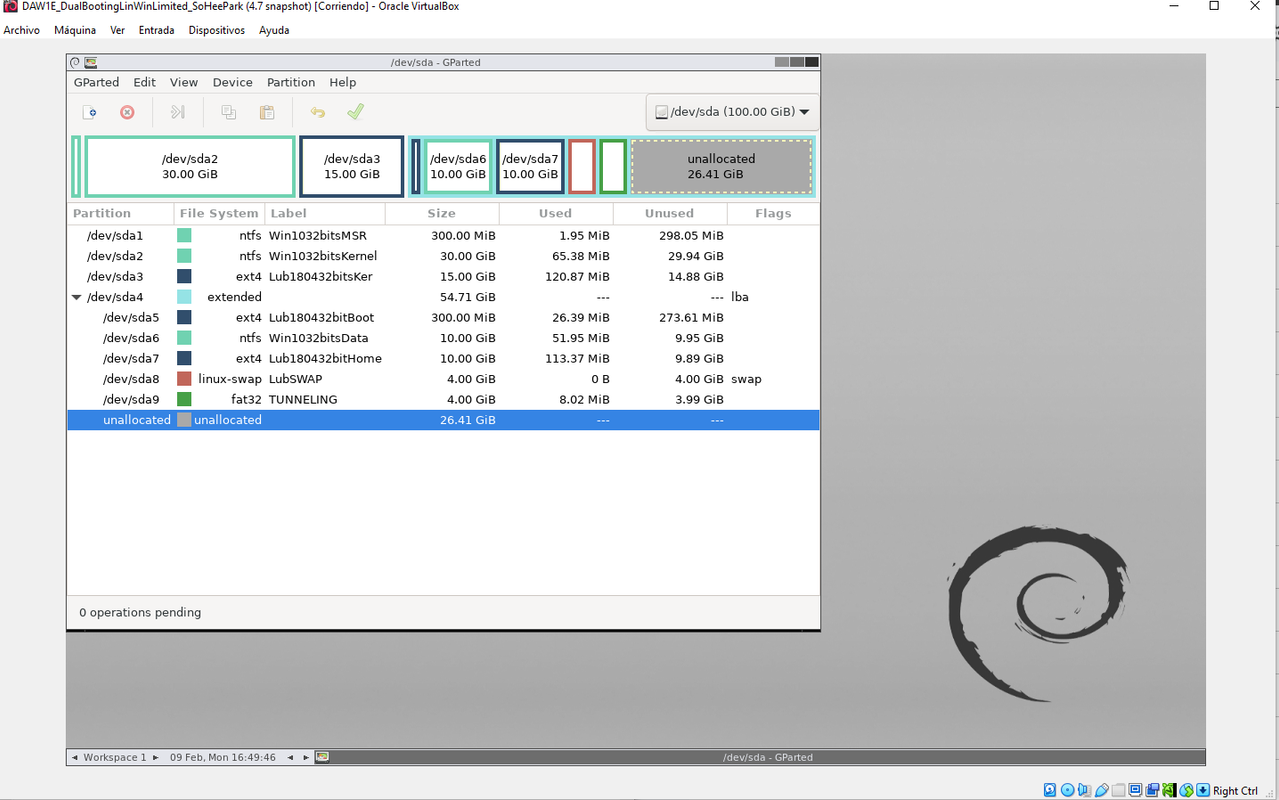
- it means the partitions are saved in the
vdi - now,
isois not needed anymore
✅ close the VM
- close from inside, to outside
- order should be
Gparted > VM > RM - 1️⃣ close black square
- 2️⃣ click on VM
X: send shutdown signal, to delete the iso - 3️⃣ close the tray and press enter
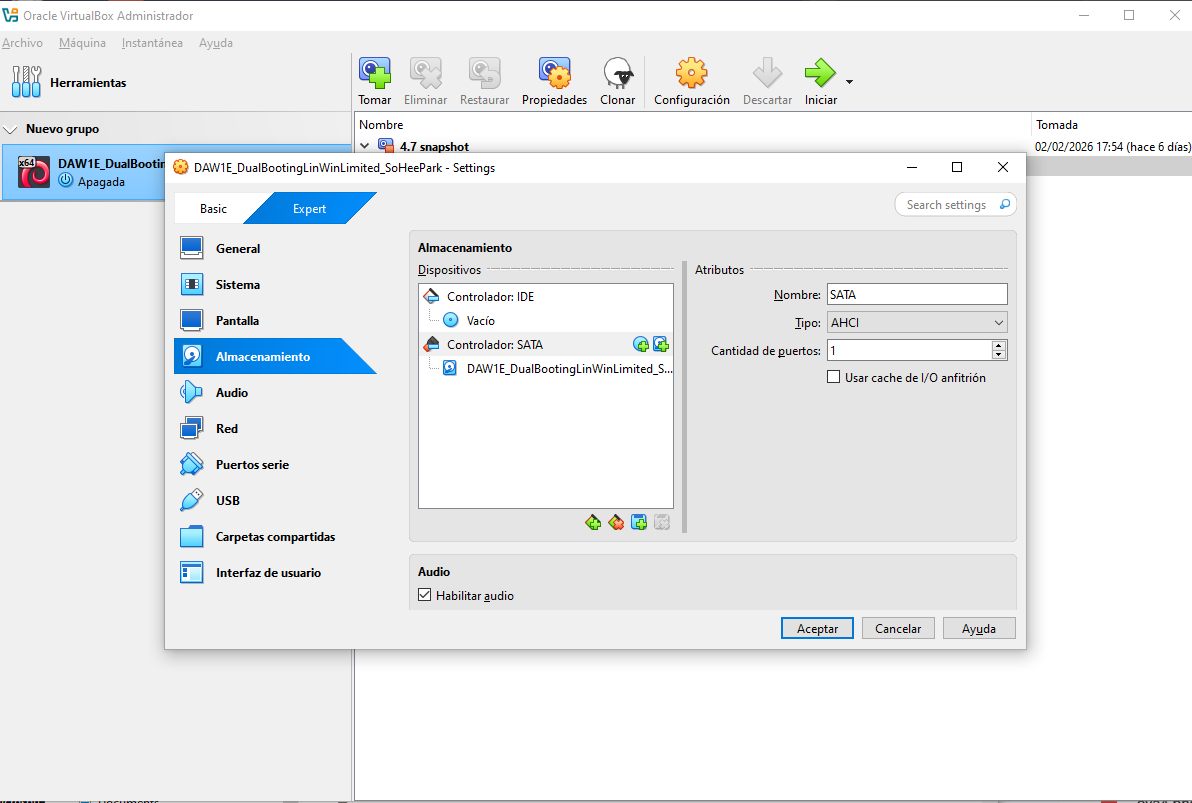
- 4️⃣ go to VirtualBox > settings > storage
- and check there is no
iso
✅ Create a snapshot
- things that you just finished are called
fresh - name the snapshot
fresh partitioning
